Insights & Inspiration

Your resource for window treatment tips, design ideas, and product guides from the experts at Off Cut Shades.

How to See Blinds on Your Window Before You Buy (What a Visualizer Can and Can't Tell You)
Featured
7 min read
Buying Guide, How-To

How to See Blinds on Your Window Before You Buy (What a Visualizer Can and Can't Tell You)

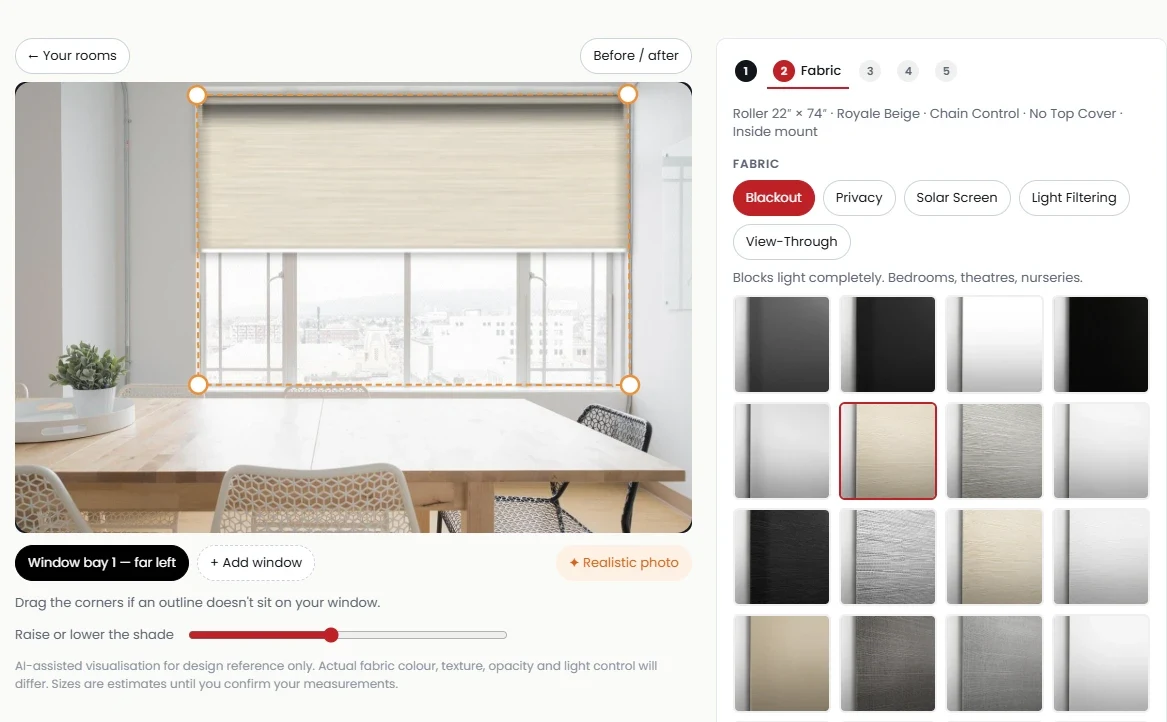
Custom blinds are made for one window, which means you can't try them on first. Most of us end up staring at a bare window, holding a tiny fabric square, trying to imagine six feet of it. That's the nervous part of buying blinds online, and it's a fair thing to be nervous about. The easiest fix is a blinds visualizer: a tool that draws a shade on a photo of your own window. We built one, and it's useful. It's also a preview and not a promise, so this guide covers both sides: how to get a good result, and what you still need to check with real fabric and a tape measure. Details about our tool and policies are as of **November 2026**. ## The Short Answer There are three ways to see blinds on your window before you buy, and they answer different questions: - **A visualizer** answers "will this style and colour suit my room?" Use it first, to narrow things down. - **Fabric samples** answer "what does this fabric really look like in my light?" Use them second, on your two or three finalists. - **A tape measure** answers "what size is my window?" Nothing else answers that one. Use all three in that order and you've covered most of what can go wrong. ## What a Blinds Visualizer Does You give it a photo of your window, and it draws a shade on that photo. Change the fabric and the picture changes with it. That's a much better test than a showroom photo of someone else's living room, because your wall colour, your floor and your furniture are all in the shot. [Our visualizer](/visualizer) runs in your browser on a phone, tablet or computer, so there's no app to download. As of November 2026 it's free with an Off Cut Shades account. It covers [roller](/shop/info/roller), [zebra](/shop/info/zebra), [sheer](/shop/info/sheer), Essential and Honeycomb [cellular](/shop/info/cellular) and [Dream Shades](/shop/info/dream-shades). ![Our visualizer with a beige roller shade drawn on a photo of the window, and the fabric choices beside it. A drawn preview, not a product photo](/images/blog/see-blinds-on-your-window-before-buying/visualizer-tool.webp) ## How to Take a Photo That Gives You a Useful Preview The preview is only as good as the photo. Our tool shows the first four of these before you upload, and they're worth following. - **Stand back.** Get the whole window and some wall in the shot. The wall matters: that's what the shade has to go with. - **Stand straight in front of the window.** Not at an angle, which makes the window harder to judge. - **Keep the window clear.** Open the curtains, pull old blinds all the way up and move anything standing in front of it. - **Take it in daylight.** You want to see the wall colour and the room clearly, because that's what you're matching. - **Start with the room that worries you most.** A fabric that's lovely against a white dining room may look different beside a dark sofa, so try the hard room first. ## Trying Shades on Your Window, Step by Step 1. **Upload your photo.** Take it on your phone or use one you already have. 2. **Check the outline.** AI finds the window, draws its outline and estimates the size. If the outline is off, drag a corner to fix it. Check how it read the window too: when we tried a wide window with several panes, it first split it into four bays, each with its own shade. 3. **Pick a shade type.** If you're stuck between two, try both. A zebra and a roller can look close in a thumbnail and very different on a big window. Our [zebra vs. roller comparison](/blog/zebra-blinds-vs-roller-shades) covers the differences a picture can't show. 4. **Try fabrics, controls and top covers.** The estimated price updates as you go, which is handy: you can see what a motor or a fabric-covered top cover does to the price while you're looking at it. If it finds more than one bay, each keeps its own choices, so you can compare two fabrics side by side. A slider raises or lowers the shade. 5. **Make a realistic photo of your favourite.** This is an AI-retouched version of the preview, and it gives you a more lifelike look at the result. Your photos and the shades you try stay saved for 7 days, so there's no rush to decide in one sitting. The tool says photos are used only to show you shades and are deleted automatically after a week (as of November 2026). ## What a Visualizer Gets Right It's strong on the questions that are hard to answer in your head: - **Scale.** How much of the wall a large shade takes up, and whether a dark fabric feels heavy at that size. - **Colour family.** Whether grey, white or beige sits better with your walls and floors. That's usually enough to rule out half the options. - **Style.** The flat look of a roller against the stripes of a zebra, on your actual window. - **Budget.** A rough idea of the price before you've fallen in love with something out of range. ## What It Can't Tell You Our own disclaimer says it plainly: the preview is for design reference only, and actual fabric colour, texture, opacity and light control will differ. In practice, that means: - **Exact colour.** A photo and a screen both change colour. "Light grey" on your phone is a guide and not a match. - **Texture.** You can't feel a weave through a screen, and you can't see much of it either. - **Light and privacy.** A photo is one moment. It can't show you how dark a blackout fabric gets, how much glare a sunscreen cuts, or what's visible from the street at night. Our [roller shades buying guide](/blog/roller-shades-buying-guide) explains how each fabric family behaves. - **Your room's small details.** A retouched photo can shift small things in the picture, so judge the shade and not the fine print of the window frame. - **Your exact size.** The size from the photo is an estimate that helps you compare shades and prices. It's not a measurement. This matters more than usual with custom blinds. Every shade is cut for your window, so we can't offer ordinary returns. Our [Fit Guarantee](/help/return-policy#fit-guarantee) covers measuring mistakes, within 30 days of delivery for one complimentary adjustment or remake per eligible shade, up to four shades per household. It doesn't cover a change of style, colour or personal preference (all as of November 2026). So "it looked different in the picture" isn't something we can fix afterwards, and that's why the next step is worth ten minutes. ## Get Samples of Your Finalists Once the visualizer has you down to two or three fabrics, [order free samples](/swatches). You can choose up to 5 (as of November 2026). Hold each one up to the window at noon, and again in the evening with the lights on, because that's when differences in colour and privacy show up. If you're near Toronto, you can also see our shades at [our showroom](/showroom). ## From Preview to Real Order You can add a shade to your cart straight from the visualizer, but it won't go through on the photo's guess. Here's what happens before checkout: 1. **Your cart marks the size as estimated.** Checkout stays locked until you confirm it. 2. **You enter your measured size.** Measure the window first. Our [measuring guide](/guides/measuring-guide) and our [step-by-step post on measuring](/blog/how-to-measure-windows-for-blinds) walk you through it, and our [inside vs. outside mount guide](/blog/inside-mount-vs-outside-mount-blinds) helps you pick how the shade sits. 3. **You approve the price at the real size.** You'll see the estimated price next to the price at your measured size, and you approve the change. 4. **We re-check the control.** A photo can underestimate a window, and some controls don't work at every size. If the one you chose doesn't fit your measured size, we switch it, tell you, and show the change before you approve. Expect the price to move at this stage. The estimate was based on an estimated size, and our [custom blinds cost guide](/blog/custom-blinds-cost-canada) shows how much size changes the bill. ## When You Can Skip the Visualizer It isn't for every purchase. Skip it if you're replacing a shade you already like with the same colour and type, or if you're doing a spare room where nobody cares what it looks like. In both cases, [get a price in 60 seconds](/quiz) and move on. It also won't settle a purely practical choice. If the question is how dark a bedroom gets or how to stop glare on a screen, a picture won't help. Go to samples and the buying guides instead. ## Visualizer FAQ **Is a photo preview accurate enough to order from?**\ For choosing a style and a colour family, it's a good start. For the final colour, use a sample. For size, use a tape measure. **Do I need to measure if the visualizer estimates the size?**\ Yes. With ours, you can't check out until you've entered a measured size and approved the price at that size. **Can I try more than one shade on the same window?**\ Yes, as many as you like. That's the main reason to use one. **Do I have to download an app?**\ Not for ours. It runs in your browser. **What if my photo shows old blinds or curtains?**\ Raise or pull them back as far as they go before you take the photo, so the frame shows. If the outline still lands in the wrong place, drag a corner to fix it. ## See It, Sample It, Measure It Start with a photo: [try the visualizer on your own window](/visualizer). Take your favourites to [free samples](/swatches), measure with [our guide](/guides/measuring-guide), and [order when you're sure](/shop). Your shades get made to that size in our Toronto factory, and by then you'll already know how they should look.
Read Article
Zebra Blinds vs. Roller Shades: Which Should You Buy? (Side-by-Side Comparison)
8 min read

Zebra Blinds vs. Roller Shades: Which Should You Buy? (Side-by-Side Comparison)

Rolled up, a zebra blind and a roller shade look almost the same: a neat tube or cassette at the top of the window. Pull them down and they live completely different lives. That's why zebra blinds vs roller shades is the question we get asked more than any other, and why people worry about picking the wrong one. We make both in the same Toronto factory, so we have no reason to push you either way. Here's the referee's version: a verdict, every round scored, then a call for each room. Product details come from our own product pages and configurator, and prices are dated **1 November 2026**. ## The 30-Second Verdict **Choose a zebra blind** if you want to play with light during the day: view in the morning, softer light at lunch, privacy at night, all without raising or lowering the shade. **Choose a roller shade** if you want to set it and forget it, need the darkest possible room, or want the lowest price. A roller is one flat panel of fabric. It's up or it's down. The tiebreaker: **do you want to fiddle with light, or forget the shade exists?** Fiddlers buy zebras. Forgetters buy rollers. Everything below is the nuance. ## Daily Life With Each ### A day with a zebra A zebra blind (also sold as a banded shade) is one loop of fabric with alternating sheer and solid stripes, hanging in two layers from one roller. Move it a little and the layers slide past each other. - **Morning:** bands aligned. Light and view come through the sheer stripes. - **Afternoon glare:** nudge it and the solid bands start covering the sheers. The room softens without going dark. - **Evening:** bands offset. The view is closed off and the room is private. On our zebras the aluminum bottom bar has an internal roller that the banded fabric glides through, which keeps the two layers together. Every zebra we make comes with a cassette at the top. ![A grey blackout zebra shade with the bands open: the pale stripes are sheer, the grey stripes are solid](/images/newHome/shades/blackout_zebra.webp) ### A day with a roller A roller shade is one sheet of fabric on a tube. You pick how much light that fabric lets through when you order, and after that your only decision is how far down to pull it. Most people leave a roller in the same spot for days. If you don't want to think about your windows, that's the point. ![White privacy roller shades pulled most of the way down in an open-plan living and dining room](/images/newHome/shades/privacy_roller2.webp) ## Zebra Blinds vs Roller Shades: Head to Head **Daytime light control: zebra wins.**\ A zebra lets in view, filtered light or almost none without moving the bottom bar. A roller gives you what its fabric does, at whatever height you leave it. **Daytime privacy: zebra, narrowly.**\ Both can be private by day with the right fabric. The zebra switches from view-through to private on the same window; a roller is chosen for one or the other. **Night privacy: a tie, and neither wins by default.**\ An open zebra is see-through at night with your lights on, whatever the fabric. Closed, it's private. Translucent, sunscreen and transparent rollers don't give night privacy; privacy and blackout rollers do. Night privacy comes from your choice, not the category. **Blackout: roller wins.**\ A blackout roller is one solid sheet of opaque fabric. A blackout zebra uses opaque bands, but it's still two striped layers passing each other. It darkens a room well; a blackout roller with a cassette gets closer to dark. Inside-mounted shades of either kind leave small side gaps, which an outside mount cuts (see [inside vs outside mount](/blog/inside-mount-vs-outside-mount-blinds)). **Price: roller wins.**\ On every size we checked, the cheapest roller costs less than the cheapest zebra. How much less is in the price section below. **Fabric choice: roller wins.**\ As of 1 November 2026 rollers come in five fabric families: blackout, privacy, translucent (light filtering), sunscreen and transparent. Zebras come with privacy or blackout bands, in 61 fabric-and-colour combinations at a 36" width. Only rollers come in sunscreen and vinyl. **Cleaning: roller wins.**\ A roller is one flat surface. A zebra is a loop with a front and back layer, so there's more to dust. Follow the cleaning instructions for your fabric either way (our warranty doesn't cover damage from ignoring them), and [ask us](/contact) if you don't have them. **Style: tie.**\ Zebras read modern and a little graphic. Rollers read minimal, and can go with an open roll or a cassette; zebras always have a cassette. It's your room. **Controls: tie.**\ Both come with chain included, glide chainless (you move the bottom bar by hand and a ZeroGravity spring holds it) or a rechargeable motor. As of 1 November 2026, at our sale price, glide chainless adds $140 and the motor $495 on either. Around kids or pets, read our [cordless blinds guide](/blog/cordless-blinds-guide); for the motor, the [motorized blinds guide](/blog/motorized-blinds-buying-guide). **Final score:** the roller takes more rounds. The zebra takes the one most people buy a zebra for, light control. That's why the tiebreaker matters more than the scorecard. Ready? [Shop now](/shop), both made to your measurements. Or [order samples of both](/swatches) and decide at your own window. ## Room-by-Room Calls **Living room: zebra.** Daylight and view most of the day, privacy in the evening, one shade. See both on our [living room shades](/shades/living-room-window-shades) page. **Bedroom: blackout roller.** If darkness is the job, choose a blackout roller with a cassette. A blackout zebra is a fair choice if "pretty dark" is enough. If you work nights, the roller wins. The [roller shades buying guide](/blog/roller-shades-buying-guide) explains why blackout fabric alone isn't the whole story, and our [bedroom shades](/shades/bedroom-window-shades) page has the options. **Home office: either.** A zebra lets you nudge the bands to kill glare. A sunscreen roller cuts glare and keeps the view without being touched. If you'd rather never adjust a shade mid-call, go sunscreen roller. **Kitchen: roller.** Near the sink or stove, choose our vinyl blackout or a PVC-blend sunscreen. Zebras don't come in either. Our [5-year warranty](/help/warranty) doesn't cover damage from excessive humidity on any fabric shade. **Condo wall of glass: zebra.** Big panes and neighbours across the way are where adjustable privacy earns its keep. Check your building's rules on street-facing colour first; our [condo guide](/blog/measuring-blinds-condo-concrete-strata) covers that. **Either works, so save the money:** a spare room, a basement, a laundry room. Nobody fiddles with the light there. Buy the roller. ## Price Reality Our prices as of **1 November 2026**, from our live configurator that day. **Every price is our sale price: 50% off our retail price.** Promotions can take it lower at checkout. One shade, CAD, chain control. Rollers show an open roll (no cover), then with our compact curved cassette, the same cover every zebra has. Zebras show privacy bands, then the cheapest blackout. **24" wide × 36" tall**\ Roller: $88 open roll, $175 with cassette\ Zebra: $227 privacy, $232 blackout **36" × 60"** (a typical bedroom window)\ Roller: $186 open roll, $290 with cassette\ Zebra: $351 privacy, $413 blackout **48" × 60"**\ Roller: $236 open roll, $358 with cassette\ Zebra: $430 privacy, $513 blackout **60" × 72"** (a typical living room window)\ Roller: $291 open roll, $430 with cassette\ Zebra: $552 privacy, $705 blackout **72" × 84"**\ Roller: $422 open roll, $586 with cassette\ Zebra: $675 privacy, $887 blackout These are entry fabrics. Our cheapest roller tier includes a blackout fabric, so a blackout roller starts at the same price as a privacy one. ### What the gap really is On a 36" × 60" window: - **Cheapest of each:** the zebra costs **$165 more** ($351 vs a $186 open roll). - **Same cassette on both:** the gap shrinks to **$61** ($351 vs $290). - **Blackout vs blackout, both with a cassette:** **$123 more** ($413 vs $290). If you'd put a cassette on your roller anyway, a zebra is a smaller step up than it looks. Happy with an open roll? The roller is roughly half the price. Fabric tier moves both more than the product does: at 36" × 60" our zebras run from $351 to $590. Our [custom blinds cost guide](/blog/custom-blinds-cost-canada) prices every product we make. Shipping is free across Canada. Every shade is custom made in Toronto, Ontario, typically ready to ship within 2 business days, then 3 to 9 business days of standard delivery in Canada (as of 1 November 2026; see our [shipping policy](/help/shipping-policy)). ## Still Torn? **Get samples of both.** [Order up to 5 free fabric samples](/swatches), shipping included in Canada, as of 1 November 2026. Ask for a zebra and a roller fabric in the same colour, and check them at noon and again at night with the lights on. **See both on your own window.** Our free [blinds visualizer](/visualizer) shows our roller and zebra shades on a photo of your window, with an estimated price. It's free with an Off Cut Shades account. Your real measurements still go into the configurator before you order. **Know what the safety net covers.** Our [Fit Guarantee](/help/return-policy#fit-guarantee) covers measuring mistakes: contact us within 30 days of delivery for one complimentary adjustment or remake per eligible shade, up to four shades per household. It covers fit, not a change of style, colour or personal preference. Swapping a roller for a zebra because you changed your mind isn't a fit problem, which is why ten minutes with samples is worth it now. ## Zebra vs Roller FAQ **Are zebra blinds better than roller shades?**\ Different, not better. Zebras win at adjustable daytime light and privacy. Rollers win at blackout, wet rooms, fabric choice and price. **Which is cheaper, zebra or roller blinds?**\ Rollers. As of 1 November 2026, at our sale price, a 36" × 60" roller starts at $186 open roll or $290 with a cassette; a zebra starts at $351. [Get your exact price in 60 seconds](/quiz). **Are zebra blinds good for bedrooms?**\ With blackout bands, yes for most people. For true darkness, a blackout roller with a cassette is stronger. **Which is easier to clean, zebra or roller?**\ The roller: one flat surface instead of two layers. **Do zebra blinds give more privacy than rollers?**\ More control by day. At night a zebra has to be closed, and a roller has to be a privacy or blackout fabric. ## Fiddle or Forget? Fiddle with light, or forget the shade exists? Answer that, and you've chosen. Either way it's cut in Toronto and priced in 60 seconds. [Shop now](/shop), compare [zebra shades](/shop/info/zebra) and [roller shades](/shop/info/roller), or read the full [zebra buying guide](/blog/zebra-blinds-buying-guide) first.

Buying GuidePricing
Read Article
How Much Do Custom Blinds Cost in Canada? 2026 Price Guide by Window Size and Type
10 min read

How Much Do Custom Blinds Cost in Canada? 2026 Price Guide by Window Size and Type

A lot of blind companies won't tell you what anything costs until someone has been to your house. We think you should be able to budget a room from your couch. So here's what custom blinds cost in Canada, per window, by size and product, with the upgrades priced separately so you can see exactly where the money goes. Every price on this page was pulled from our own configurator on **24 October 2026**, in Canadian dollars. Every price is our sale price: 50% off our retail price. Watch for promotions, which can take it lower still at checkout. Shipping across Canada is free. When our prices change, we re-pull this page and the date changes with it, so if the date above is old, the configurator is the final word. ## Custom Blinds Cost in Canada: The Master Price Table Three window sizes cover most homes: a **small** window (24″ wide × 36″ tall, think bathroom or basement), a **medium** one (36″ × 60″, the classic bedroom window) and a **large** one (60″ × 72″, a living-room window). Sizes are width × height in inches. Each product shows the entry fabric first, then the cheapest blackout fabric in brackets. "Cordless" and "motorized" are the same entry fabric with that control instead. ### Roller shades Entry fabric: Everyday Privacy. Blackout: Everyday Blackout. Open roll (no cassette), chain control as standard. - **24″ × 36″:** $88 (blackout $100) · cordless $228 · motorized $583 - **36″ × 60″:** $186 (blackout $230) · cordless $326 · motorized $681 - **60″ × 72″:** $291 (blackout $367) · cordless $431 · motorized $786 Rollers are the cheapest way to cover a window to measure, and the widest fabric range we sell. [Roller shades buying guide](/blog/roller-shades-buying-guide) · [See roller shades](/shop/info/roller) ### Zebra blinds Entry fabric: Wales. Blackout: Sonoma. Price includes the compact curved cassette; chain control as standard. - **24″ × 36″:** $227 (blackout $232) · cordless $367 · motorized $722 - **36″ × 60″:** $351 (blackout $413) · cordless $491 · motorized $846 - **60″ × 72″:** $552 (blackout $705) · cordless $692 · motorized $1,047 Cordless zebras need a compatible bottom bar; the configurator only offers cordless where it works. [Zebra blinds buying guide](/blog/zebra-blinds-buying-guide) · [See zebra blinds](/shop/info/zebra) ### Custom cellular shades Entry fabric: Loom. Blackout: Loom Blackout. Cordless glide control is included in every price below, so there's no separate cordless column. - **24″ × 36″:** $255 (blackout $260) · motorized $610 - **36″ × 60″:** $409 (blackout $437) · motorized $764 - **60″ × 72″:** $602 (blackout $662) · motorized $957 [Cellular shades buying guide](/blog/cellular-shades-buying-guide) · [See custom cellular](/shop/info/cellular) ### Essential Honeycomb cellular shades Our simpler cellular line, made from 18″ to 72″ wide and up to 72″ tall. Three fabrics: Everyday Light Filtering, Classic Blackout and Duo (day and night). There are no control or motor choices to make on this one. - **24″ × 36″:** $80 light filtering · $120 blackout · $185 Duo - **36″ × 60″:** $167 light filtering · $255 blackout · $390 Duo - **60″ × 72″:** $297 light filtering · $467 blackout · $708 Duo [See Essential Honeycomb](/shop/info/simply-cellular) ### Motorized: what the column includes The motorized prices above are the shade with our rechargeable smart-home motor. The motor needs a way to be told what to do, and those parts are priced separately because one set covers many shades: - **Remote:** $95. It runs up to 16 channels plus custom groups, so one remote can cover a room or more. - **Charger:** $30 - **Smart Hub (Connector+):** $225, for app, schedules and voice control. One per home. So your first motorized window costs the shade plus $95 to $350 in accessories. Your fifth costs the shade. More in our [motorized blinds buying guide](/blog/motorized-blinds-buying-guide). ### What every price includes A price is only useful if you know what's in it. As of 24 October 2026, every shade in the table comes with: - **Made to your measurements** in our Toronto factory. Not cut down from a stock size. - **Free shipping** anywhere in Canada. - **A 5-year warranty** on manufacturing defects in materials and workmanship. If one shows up, we repair or replace the shade. Normal wear and measuring mistakes aren't covered by the warranty itself. - **Our Fit Guarantee.** Mis-measured? Contact us within 30 days of delivery for one complimentary adjustment or remake per eligible shade, up to four shades per household. Details are on our [Fit Guarantee page](/help/return-policy#fit-guarantee). - **Free fabric samples** before you buy, so the colour on your screen isn't a guess. What isn't in the price: a sales visit, and a measuring appointment. You measure, and that's part of how the price stays where it is. Full terms are on our [warranty page](/help/warranty). **Your windows aren't these three sizes.** Nobody's are. [Get your exact price in 60 seconds](/quiz). ## What Drives the Price Four things move the number. Here's roughly how much each one moves it, using our own prices from the table above. ### 1. Size Bigger windows need more fabric, a longer tube and a longer bottom bar. A medium roller ($186) costs about twice a small one ($88), and the large one ($291) is another 55% or so on top. What most people don't know: on rollers, zebras and custom cellular, we price in **6-inch steps**, rounding up. A 31″-wide and a 36″-wide shade cost the same. A 36¼″-wide shade costs the same as a 42″ one. That's not a reason to shave your measurement (a shade that doesn't fit is the most expensive kind), but it does explain why two windows that look the same size can price differently. If you're unsure how to measure, our [measuring guide](/blog/how-to-measure-windows-for-blinds) takes about 10 minutes. ### 2. Fabric Every fabric sits in a price group. On a 36″ × 60″ shade, moving from our entry fabric to the top of the range costs: - **Roller:** $186 to $361 at the top (about +94%). A mid-range fabric is around $297 (+60%). - **Zebra:** $351 to $590 (about +68%) - **Custom cellular:** $409 to $714 (about +75%) Blackout, at the entry level, costs less extra than people expect: +$44 on a medium roller (+24%), +$62 on a zebra (+18%), +$28 on a custom cellular (+7%). On Essential Honeycomb it's +$88 (+53%). ### 3. Control This is where the biggest jumps live: - **Chain:** included. On our rollers, the chain sits in a Safety Shield that meets the Canadian corded window covering regulation. - **Cordless (glide):** +$140 on rollers and zebras. That's +75% on a medium roller, much less on a large zebra. Included on custom cellular. - **Motorized:** +$495 over chain on rollers and zebras (more than doubling a medium roller), +$355 over cordless glide on custom cellular. Plus accessories, as above. Our [cordless blinds guide](/blog/cordless-blinds-guide) covers how glide works and when it's worth it. ### 4. Top cover A roller can be left as an open roll or finished with a cassette that hides the tube. A compact curved cassette adds $104 on a 36″-wide roller. Zebras already include it in the prices above. ### What doesn't change the price Inside mount or outside mount. Same shade, same price. Pick the mount that suits the window, not the budget. ([Inside vs. outside mount](/blog/inside-mount-vs-outside-mount-blinds) if you're torn.) ## Worked Examples Per-window prices are useful. Whole-home totals are what you actually budget for. Here are three real budgets, priced line by line in our configurator on 24 October 2026. ### A one-bedroom condo: 6 windows, $1,563 Rollers throughout, chain control, open roll. - Living and dining: 3 × 48″ × 84″, Everyday Privacy, $267 each = $801 - Bedroom: 2 × 48″ × 84″, Everyday Blackout, $337 each = $674 - Den: 1 × 24″ × 36″, Everyday Privacy = $88 - **Total: $1,563**, about $261 a window Condo windows are often tall and mounted in concrete, which changes the measuring, not the price. Our [condo measuring guide](/blog/measuring-blinds-condo-concrete-strata) covers it. ### A three-bedroom house: 12 windows, $3,308 A realistic mix: zebras where you sit, blackout where you sleep, cordless where the kids are. - Living room: 3 × 36″ × 60″ zebra, Wales, chain, $351 each = $1,053 - Kitchen: 1 × 30″ × 48″ roller, Everyday Privacy, chain = $155 - Main bedroom: 2 × 36″ × 60″ roller, Everyday Blackout, chain, $230 each = $460 - Two kids' rooms: 4 × 36″ × 60″ roller, Everyday Blackout, cordless, $370 each = $1,480 - Bathrooms: 2 × 24″ × 36″ Essential Honeycomb, light filtering, $80 each = $160 - **Total: $3,308**, about $276 a window ### The same house, motorized: $8,113 Every roller and zebra motorized. The two bathroom Essential Honeycomb shades stay as they are, since that line has no motor option. - Living room: 3 zebras, motorized, $846 each = $2,538 - Kitchen: 1 roller, motorized = $650 - All bedrooms: 6 blackout rollers, motorized, $725 each = $4,350 - Bathrooms: 2 Essential Honeycomb = $160 - Smart Hub: $225 - Remotes: 2 × $95 = $190 - **Total: $8,113** That's $4,805 more than the mixed house. Our honest read: motorize the windows you can't reach or the ones you'd actually schedule, and leave the rest manual. It's your call, and now you know what it costs. ## Why Quotes Vary So Much If you've collected a few quotes for the same windows, you've probably seen numbers that are hundreds of dollars apart. The fabric and the hardware explain some of that. How the blinds are sold explains a lot of the rest. - **The in-home model.** A consultant drives to your house, measures, shows samples and writes a quote. Their time, their travel and sometimes a commission are inside that number, whether or not you buy. - **The showroom model.** You go to them. Rent, staff and floor samples are inside the number. - **The online, factory-direct model.** You measure, you configure, you see the price. The shade is made to your size and shipped to you. None of these is a scam. In-home service is a real service, and some people want it. But it isn't free, and it's usually invisible on the quote. We're the third model. Our shades are made in our Toronto factory, typically ready to ship in 2 business days, with delivery in 3 to 9 business days and free shipping across Canada (as of 24 October 2026). And if you'd rather see fabrics in person, you can visit our [showroom](/showroom). Nobody comes to your house. One practical tip: when you compare quotes, compare the same thing. Same size, same fabric type (privacy vs. blackout), same control, same top cover. A cheap quote with chain and an open roll is not cheaper than a dearer one with cordless and a cassette. It's a different product. ## How to Spend Less Without Regret Nobody needs to sell you the most expensive option. Here's where we'd save: - **Put blackout only where people sleep.** Living rooms rarely need it, and our entry privacy fabrics cost less. - **Go cordless where it matters, chain where it doesn't.** Kids' rooms and anywhere a pet chews cords: cordless. A home office with no small children: the chain is fine and $140 cheaper per window. - **Motorize the hard windows, not every window.** High, wide or behind furniture: motor it. The rest: don't. - **Look at Essential Honeycomb for small windows.** At 24″ × 36″, an Essential Honeycomb light filtering shade is $80. It's the least expensive cellular shade we make. - **Start with entry fabrics, then upgrade only the room you look at most.** The difference between entry and top fabric is often bigger than the difference between products. - **Order [free samples](/swatches) before you order shades.** The cheapest shade is the one you don't have to replace because the colour was wrong. ## Price Your Exact Windows This table is three sizes. Your windows are their own sizes, and the configurator prices them exactly, with the same sale applied, before you give us anything but measurements. ## FAQ **How much do blinds cost for a whole house in Canada?**\ With our prices on 24 October 2026, a 12-window house with a mix of zebras, rollers and small cellular shades came to $3,308, about $276 a window. The same house fully motorized came to $8,113. A six-window condo in rollers was $1,563. **How much are custom zebra blinds per window?**\ From $227 for a 24″ × 36″ window, $351 for 36″ × 60″ and $552 for 60″ × 72″, entry fabric with chain control and a cassette included, as of 24 October 2026. Cordless adds $140; motorized adds $495. **Why are blind quotes so different between companies?**\ Mostly the sales model. An in-home visit, a showroom and an online order carry different costs, and those costs are in the price. After that, check you're comparing the same fabric type, control and top cover. **What makes custom blinds more expensive?**\ In our pricing: size first, then control (motorized can more than double a medium roller), then fabric (up to about +94% from entry to top range on a medium roller). Mount type doesn't change the price. **Are online blind prices cheaper than in-home quotes?**\ Usually, because nobody has to drive to your house. You do the measuring yourself, which is easier than it sounds: our [measuring guide](/blog/how-to-measure-windows-for-blinds) walks you through it. ## Get Your Number That's the honest table. Your windows are more specific, and 60 seconds from their own number. [Get a price in 60 seconds](/quiz).

PricingBuying Guide
Read Article
Cordless Blinds Guide: How They Work, Weight Limits and Why They're the Child-Safe Default
9 min read

Cordless Blinds Guide: How They Work, Weight Limits and Why They're the Child-Safe Default

Most people come to cordless blinds for one of three reasons. There's a toddler in the house, or a grandchild who visits. There's a cat that treats a dangling chain as a personal invitation. Or you've simply wrestled one bead chain too many and you're done. Somewhere along the way you probably also heard that "corded blinds are banned in Canada", which is close to true but not quite. This guide covers how cordless blinds actually go up and down (no magic, just a spring), where the real size limits are, what the Canadian cord rules do and don't say, and how to decide between cordless and motorized. Every price and limit below is dated, because they change. ## How Cordless Actually Works Our cordless option is called **glide chainless**. There's no chain and no cord. You hold the bottom bar and move the shade to where you want it. Pull it down a little, lift it up a little, let go, and it stays. The thing doing the work is a spring inside the roller tube. Our ZeroGravity™ spring balances the weight of the shade, so the fabric feels close to weightless in your hand and doesn't creep up or slide down once you've let go. Drive wheels run inside the tube, and a foam layer around the aluminum shaft keeps the movement quiet. In practice it takes a light touch: one hand, one motion, done. ![Glide chainless: you move the shade by the bottom bar, and a spring balances the weight](/images/shadeinfo/control-options/zero-gravity.jpg) How it feels by product, as of October 2026: - **Roller shades:** you move the whole shade by its aluminum bottom bar. Up for light, down for privacy, anywhere in between. - **Zebra blinds:** same bottom-bar lift. The aluminum bar on our zebras holds the two layers of banded fabric together and aligned, so it doubles as your handle. - **Custom cellular shades:** you lift or lower the shade at the bottom rail, and the same ZeroGravity™ spring keeps it where you leave it. One practical point that follows from the design: you have to be able to reach the bottom bar. On a normal window that's never an issue. On a tall one, we come back to it in the limits section. ## The Safety Story Here's the accurate version of the Canadian rules, because the internet version is usually wrong in one direction or the other. **What the regulations are.** Canada's Corded Window Covering Products Regulations came into force on **May 1, 2021** ([Justice Laws, SOR/2019-97](https://laws-lois.justice.gc.ca/eng/regulations/SOR-2019-97/FullText.html), current to September 30, 2026). Health Canada says they cover corded window coverings "manufactured, imported, advertised or sold in Canada," custom-made and off the shelf alike ([Health Canada industry guidance](https://www.canada.ca/en/health-canada/services/consumer-product-safety/reports-publications/industry-professionals/corded-window-coverings-regulations.html), page dated September 17, 2025). **What they require.** Any cord a child can reach must be no longer than **22 cm** when pulled, and any loop no bigger than **44 cm** around. A cord that's unreachable has to stay unreachable whether the covering is fully open, fully closed or anywhere in between, for its whole useful life. Products also carry a bilingual strangulation warning. **What they don't do.** They are not a ban on all corded blinds. A corded product that meets the limits can still be sold. And the rules govern what's made, imported, advertised and sold. They don't make it illegal to own the blinds already hanging in your house. **What Health Canada actually advises.** Its home-safety page says children between 1 and 3 years old are most at risk, and that the safest window coverings are ones without long accessible cords. Its advice for older corded coverings at home is to replace them with newer ones, and until then to always keep cords out of a child's reach ([Health Canada, Window covering safety](https://www.canada.ca/en/health-canada/services/home-safety/blind-cord-safety.html), page dated September 17, 2025). **Where we stand.** Our chain roller shades are built for these rules: every one comes with our Safety Shield, a tested device that meets the Canadian Corded Window Covering Regulations, with the chain concealed in it. That's a perfectly reasonable choice for an office or a guest room. But compliant and cordless aren't the same thing, and if you're furnishing a nursery, a kid's room, a playroom or anywhere a crib or bed sits near a window, the honest advice is to skip the chain entirely. No chain means nothing to tie up, wrap or check later. Pets are the less-discussed half of this. A cat batting a chain, a dog that grabs anything that swings: none of that is a regulatory issue, and all of it is solved the same way. ## Real Limits Cordless isn't available on every size, and the reason is weight. The spring has to balance the full weight of the fabric and bottom bar. A bigger, heavier shade needs a bigger spring, and that bigger spring needs a wider shade to fit. We ran our configurator's own compatibility check on **18 October 2026** for roller shades (a light privacy fabric and one of our heavier blackout fabrics) and zebra blinds. Here's what came back for glide chainless: - **Narrowest:** 10" wide. Below that, it isn't offered. - **Up to 95" tall:** available at every width we tested, from 10" up to 108". - **96" tall and up:** the shade moves to a larger spring, which needs the shade to be at least about 31" wide. A narrow, very tall window (say 24" wide and 96" tall) can't be glide chainless. - **Heavy fabric on very tall windows:** with one of our heavier blackout fabrics, a few combinations around 36" to 38" wide and 108" to 120" tall came back unavailable, while wider shades at the same heights were fine. On custom cellular shades, glide chainless is offered across our full cellular size range, 12" to 96" wide and 6" to 96" tall, as of October 2026. You don't need to memorize any of this. When you type your width and height into the configurator, it runs the same check and only shows the controls that will work at that size. If glide chainless doesn't appear, that's why. **The reach question.** Weight is one limit. Reach is the other. If the bottom bar of a fully raised shade ends up above where you can comfortably grab it (a transom, a two-storey window, a shade behind a deep kitchen counter), cordless is the wrong tool even when it's technically available. That's the line where motorized takes over. Our [motorized blinds guide](/blog/motorized-blinds-buying-guide) covers costs, batteries and smart home compatibility in detail. ## Durability and Lifespan The fair question about any spring is whether it wears out. Here's what we can and can't tell you. What we can say: we don't publish a cycle rating for the glide chainless spring, so we're not going to invent one. The ZeroGravity™ system is designed to balance the shade evenly for smooth daily use. What we'd watch for on any spring-balanced shade is a shade that no longer stays put: it drifts up on its own, sinks after you let go, or suddenly feels much heavier than it used to. What the warranty says, as of October 2026: our [5-year warranty](/help/warranty) covers manufacturing defects in materials and workmanship that appear within five years of the original purchase date. It doesn't cover normal wear and tear, damage from accidents or misuse, or problems caused by incorrect measurement or installation. If your lift misbehaves, [contact us](/contact) and our team will review it. Two habits that help any cordless shade: move it by the bottom bar rather than tugging the fabric, and let it travel rather than forcing it past where it wants to stop. ## Cordless Across Our Products Here's who offers what, as of October 2026. **Roller shades.** Three options: chain (included in the price), glide chainless, or motorized. Glide chainless adds **$140.00** per shade. A 36" × 60" roller in our entry fabric tier with an open roll is $186.00 with chain and $326.00 glide chainless. [See roller shades](/shop/info/roller). **Zebra blinds.** The same three options, and glide chainless is the same **$140.00** per shade. [See zebra blinds](/shop/info/zebra). **Custom cellular shades.** Cordless by design: glide chainless is the standard lift and the price you see includes it. There's no chain option. A 36" × 60" custom cellular in our entry fabric group is $409.00 with glide chainless. [See cellular shades](/shop/info/cellular). **Sheer shades.** Chain or motorized. No glide chainless option, so if you want sheer without a chain, motorized is the route. [See sheer shades](/shop/info/sheer). **Top-down/bottom-up.** We don't offer top-down/bottom-up cellular shades as of October 2026. All prices above are in CAD, per shade, as of 1 November 2026, at our sale price of 50% off our retail price. Watch for promotions, which can take it lower still. Shipping is free across Canada. Glide chainless used to cost more than it does now, so if you priced it earlier this year, check again. Do cordless blinds cost more? On rollers and zebras, a little: $140.00 per shade over a chain. On custom cellular, nothing extra, because cordless is the only manual option. ## Cordless vs. Motorized: How to Decide Both get rid of the chain. The difference is how you move the shade and what you pay. Three questions settle it. **1. Can you reach the bottom bar?** If yes, cordless is the natural choice. If the shade is high, over a counter or behind furniture, go motorized. **2. How many windows, and how often do you move them?** One or two shades you adjust by hand once a day: cordless. A living room wall of five shades you want to move together, or on a morning schedule: that's what motorization is for. **3. What's the budget?** On a 36" × 60" roller shade as of 1 November 2026, glide chainless adds $140.00 and motorized adds $495.00 per shade, plus a remote ($95.00) or smart hub ($225.00) if you want them. On custom cellular, stepping up from glide chainless to motorized adds $355.00 per shade. Motors also need occasional charging. Cordless needs nothing at all. A mixed home is completely normal: cordless in the kids' rooms and wherever you can reach, motorized on the tall living room window. You can [shop motorized solutions](/motorized-solutions) and cordless in the same order. ## Cordless Blinds FAQ **How do cordless blinds work without a cord?**\ A spring inside the roller tube balances the weight of the shade. You move it by the bottom bar with a light touch, and it stays where you let go. **Do cordless blinds break easily?**\ They're built for everyday use. We don't publish a spring cycle rating, but our 5-year warranty covers manufacturing defects in materials and workmanship (not normal wear or misuse). Moving the shade by the bottom bar, not the fabric, is the best habit. **Are corded blinds illegal in Canada?**\ No. Since May 1, 2021, corded window coverings made, imported, advertised or sold in Canada must meet strict cord-length and loop limits. Compliant corded products can still be sold, and owning older blinds isn't illegal. Health Canada still recommends replacing coverings with long accessible cords. **What size is too big for cordless blinds?**\ On our rollers and zebras, as of October 2026: under 10" wide, or 96" or taller on shades narrower than about 31", isn't available, and a few very tall heavy-fabric sizes aren't either. The configurator only shows cordless when it works at your size. **Do cordless blinds cost more?**\ On rollers and zebras, glide chainless adds $140.00 per shade (as of 1 November 2026, at 50% off our retail price). On custom cellular, it's included. ## Choose Cordless No cords, no chains, nothing to childproof later. [Shop cordless](/shop), the default that should have always been the default. Not sure which shade yet? [Get a price in 60 seconds](/quiz).

Buying GuideHow-To
Read Article
Motorized Blinds Buying Guide: Costs, Battery vs. Wired, and Smart Home Compatibility
11 min read

Motorized Blinds Buying Guide: Costs, Battery vs. Wired, and Smart Home Compatibility

Motorized blinds are the upgrade everyone wants and almost nobody prices before they fall for it. You see the demo, the shades glide down at sunset, then the quote lands and the conversation stops. Right behind the sticker shock come two more worries: will I be up a ladder charging batteries every month, and will this thing actually talk to my Alexa, my Google Home or my iPhone? This motorized blinds buying guide answers all three. What a motor adds to your day, what it adds to the price (in Canadian dollars, dated, with the motor premium pulled out on its own), how the battery holds up, and a plain compatibility list for the one motor we sell. There's also a section on who should skip motorization, because for a lot of windows the honest answer is "not this one." Every product detail below comes from our own [motorization page](/motorized-solutions) and live configurator as of 10 October 2026, and every price is dated. ## What Motorization Actually Adds The obvious part is that you stop pulling chains. The less obvious part is what you start doing instead. **Schedules.** Your bedroom shade lowers at 9 p.m. and rises at 7 a.m. whether you remember or not. A west-facing living room closes at 3 p.m. in July. Schedules, scenes and voice all run through the Smart Life app (details, and the hub you need, in the compatibility section below). **Groups.** Three windows in a row move as one. Our remotes control shades individually or in groups, up to 16 channels plus custom groups, so you can run a room from the nightstand without opening your phone. **Reach.** This is where motorization stops being a luxury. A window over a stairwell, a two-storey great-room wall, a floor-to-ceiling condo pane behind a sectional. If you can't reach the chain, you don't use the shade, and a shade you don't use is money on the wall. Our post on [when motorizing makes sense](/blog/when-to-motorize-shades) covers these situations, and our [condo measuring guide](/blog/measuring-blinds-condo-concrete-strata) covers tall windows. **Accessibility.** For anyone with limited grip or mobility, a chain is a daily obstacle and a button or a voice command removes it. **No cords at all.** No chain, no cord, nothing to loop. With small children or pets, that's not a bonus feature, that's the feature. **Quiet.** Our motors run at around 32 dB, roughly a whisper. You'll hear it in a silent bedroom, not over a conversation. Who gets the most out of it: homes with many or very tall windows, people who already run a smart home, and anyone for whom reaching a chain is a problem rather than a chore. ## The Real Costs (CAD, 2026) These are our prices as of **1 November 2026**, pulled from our live configurator that day. **Every price below is our sale price: 50% off our retail price.** Watch for promotions, which can take it lower still at checkout. **The motor premium, isolated.** On any of our [roller](/shop/info/roller), [zebra](/shop/info/zebra) or [cellular shades](/shop/info/cellular), the motor adds a fixed amount per shade. It doesn't scale with the size of the window. - **Roller or zebra, motor instead of chain:** +$495.00 per shade - **Custom cellular, motor instead of glide chainless:** +$355.00 per shade (cellular shades include the chainless lift as standard, so the step up to a motor is smaller) **Motor accessories, bought once.** None of these are per-window. - **Remote:** +$95.00 (one remote runs up to 16 channels, so one per home or per floor is typical) - **Connector+ Hub:** +$225.00 (needed for app control, schedules and voice; one per home) - **Charger:** +$30.00 (optional; see the battery section) **Standard vs. motorized, per window.** Roller shades, chain control, open roll, from our lowest fabric group to our highest, with the motor added: - **24" wide × 36" tall:** chain $88.00 to $146.00, motorized $583.00 to $641.00 - **36" × 60"** (a typical bedroom window): chain $186.00 to $361.00, motorized $681.00 to $856.00 - **48" × 60":** chain $236.00 to $472.00, motorized $731.00 to $967.00 - **60" × 72"** (a typical living room window): chain $291.00 to $630.00, motorized $786.00 to $1,125.00 - **72" × 84":** chain $422.00 to $901.00, motorized $917.00 to $1,396.00 For the other two product lines on the same 36" × 60" window, same date: a zebra blind in our entry fabric group with a compact cassette runs $351.00 with chain and $846.00 motorized. A custom cellular shade in our entry fabric group runs $409.00 with glide chainless and $764.00 motorized. **Multi-window math.** Because the remote and hub are bought once, the per-window cost drops as you add windows. Five 36" × 60" rollers in our entry fabric, motorized, with one remote and one hub: $3,725.00. The same five on chain: $930.00. That's a premium of $2,795.00, or $559.00 per window including the shared accessories. Motorize one window with the same remote and hub and it carries an $815.00 premium on its own. Automating the room beats automating the window. Fabric and size still set the base price; our [roller](/blog/roller-shades-buying-guide), [zebra](/blog/zebra-blinds-buying-guide) and [cellular](/blog/cellular-shades-buying-guide) buying guides have those numbers. Or skip the arithmetic: [get a motorized price in 60 seconds](/quiz) for your own window and fabric. [Shop motorized blinds](/motorized-solutions) when you're ready. ## Battery vs. Plug-In vs. Wired Start with what we sell, because it keeps this section honest. **Our motor is a rechargeable battery motor.** The lithium-ion battery is built in, so there's nothing to swap and no battery pack hanging off the bracket. We don't offer a plug-in or hardwired motor in our configurator as of October 2026, and no solar panel add-on either. Here's how battery compares with the alternatives you'll see elsewhere. **Rechargeable battery (what we make).** No electrician, no wires, works in any window including a rental. The trade-off is that you charge it. Our motors are rated for up to 300 up/down cycles per charge, roughly six months with typical use; the math is in the next section. Charging is by cable (our motorization page specifies USB-C) with the shade in place. If you'd rather not use a cable and adapter you already own, the charger add-on is $30.00. **Plug-in.** A motor with a cord to a wall outlet. Never charge it, but there's a cable from the top of your window to the nearest plug, and most windows don't have one near the top. Fine behind a sofa, ugly above a sink. **Hardwired.** Low-voltage wiring run inside the wall to each window. It's the right answer in a new build or a gut renovation where the walls are open anyway. In a finished home it means an electrician, drywall patches and paint, and that work usually costs more than the motor. For a retrofit, hardwiring is rarely the sensible choice. **Solar.** Some sellers offer a small panel that sticks to the glass and trickle-charges the motor. It needs real sun and adds a panel to the view. It's not an option on our configurator as of October 2026. Our honest take: for an existing home, battery wins on cost and on not opening walls. The number to ask any seller for is cycles per charge. If they can't tell you, that's your answer. ## Smart Home Compatibility, Verified "Works with smart home" means nothing until a seller names the motor and the platform. So, naming ours. Every motorized shade we sell uses one motor, the Stealth Rechargeable Zigbee Motor. Zigbee is its radio; it has no Wi-Fi of its own, which is why the hub matters. **How control works, in layers:** - **Remote (no hub needed).** Our multi-channel remote talks straight to the motor, up to 16 channels plus custom groups. If all you want is a button on the nightstand, this is the whole system. - **Smart Life app (hub needed).** The Connector+ Hub joins your home Wi-Fi and bridges to the motors. With it, the free Smart Life app (iOS and Android) gives you control from anywhere, schedules, scenes and groups. - **Voice assistants (hub needed).** Voice goes through the app, so the hub is required. ![Our remote, Connector+ Hub and the Smart Life app, with the platforms the app links to](/images/info/automation.png) **Platform by platform, as of 10 October 2026:** - **Amazon Alexa:** yes, through the Connector+ Hub and the Smart Life app. Link your Smart Life account to the Alexa skill and your shades appear as devices. - **Google Home / Google Assistant:** yes, same route, through the hub and the app. (Tuya, the company behind Smart Life, lists Amazon Alexa and Google Assistant as its voice assistant integrations; [Tuya, July 2026](https://www.tuya.com/industry-details/smart-life-app-what-it-is-how-it-works-and-what-it-means-for-smart-home-users).) - **Apple HomeKit / Apple Home:** no native support. Our shades do not show up in the Apple Home app. Tuya describes Siri control as working "through appropriate integration," which in practice means Siri Shortcuts triggering Smart Life scenes, not HomeKit. If your home runs on Apple Home, we are not the right fit, and we'd rather tell you now. - **Samsung SmartThings:** the Smart Life app lists SmartThings among its third-party services, but we have not tested that link ourselves, so we don't promise it. - **Matter:** not something we can verify for our Connector+ Hub as of October 2026. Don't buy our motors on the assumption that they'll be Matter devices. The hub is a one-time $225.00 and one serves the whole home. Every compatibility claim here is dated for a reason: ecosystems change, and so will this page. ## Battery Life Math **The formula:** cycles per charge ÷ cycles per day = days between charges. Our motors are rated for up to 300 up/down cycles per charge; one cycle is one trip down and back up. - **Bedroom, down at night and up in the morning:** 1 cycle a day. 300 ÷ 1 = about 300 days. Our motorization page quotes approximately six months with typical use, which allows for the odd extra adjustment, so plan on twice a year. - **Living room on a sun schedule, closing at mid-afternoon and opening at dusk, plus a morning run:** 2 cycles a day. 300 ÷ 2 = 150 days, about five months. - **A kid's room that goes up and down all day:** 4 cycles a day. 300 ÷ 4 = 75 days, about two and a half months. Even the heavy case is a charge every season, not every month. **The cold-window caveat.** Lithium-ion batteries give less when they're cold, and a motor sits right against the glass. In a Canadian January, on a draughty window, expect fewer cycles than the rating and charge a little sooner. **Charging, in practice.** You don't take the shade down. You plug the cable into the motor, let it charge, unplug. Treat it like a furnace filter: two dates a year, every shade at once. Recharging is normal upkeep, not a warranty item (our [5-year warranty](/help/warranty) excludes recharging and routine motor maintenance, as of October 2026). If a motor ever behaves oddly, we're in Toronto, not a call centre on another continent. [Contact us](/contact) for motor support and charging help, or ask at the [showroom](/showroom). ## Who Should Skip Motorization We'd rather sell you the right shade than the expensive one. **Skip it for a single, easy-reach window.** If you can pull the chain in two seconds, a motor saves you two seconds and costs $495.00 plus a remote. That money buys a much better fabric, a blackout upgrade, or a second window done properly. **Skip it if the budget is tight.** On a 36" × 60" roller in our entry fabric, motorizing one window, with its remote and hub, costs more than four chain-operated windows in the same fabric. Cover every window first and motorize the hard ones later. One catch: the motor is ordered as part of a new shade in the Control step, and we don't sell it separately as a retrofit kit as of October 2026, so decide per window at order time. **Skip it if you need Apple Home.** See the compatibility section. We'd rather lose the sale than have you find out after install. **Skip it for a very narrow window.** On our custom cellular shades the configurator only offers the motor from 19" wide, and on rollers and zebras it checks each size and won't show the motor where it doesn't fit. If the option isn't there, that's why. **Skip it if you hate charging anything.** Twice a year is not much, but it is not zero. If that's a deal-breaker, you want a chain or our glide chainless lift, which needs nothing at all. **Go ahead if** you have tall or unreachable windows, three or more windows to move together, a smart home you actually use, or a reason to want zero cords. ## Ordering Motorized: What to Decide Our configurator asks for the motor in the Control step, after shade type, size and fabric. Decide these before you get there. 1. **Control preference.** Remote only, or app and voice too? Remote only is simpler and cheaper. App control adds the Connector+ Hub, once, and opens up schedules and voice. 2. **Which windows.** List every window you want on a motor. The premium is per shade, so the list is the budget. Not sure? Start with one room and see whether the schedule life suits you before you do the whole house. 3. **Charging access.** Can you reach the motor with a cable twice a year, by step-stool if not by hand? On a two-storey window, decide now how. 4. **Group planning.** Which shades move together? Three bedroom windows on one channel, the living room on another. Sketch your groups before you pair. 5. **Control side.** The configurator asks which side the motor sits on. Pick the side that's easier to reach with a cable. 6. **The chain-free bonus.** For a child's room, this is the tiebreaker: a motorized shade has no cord to loop at all. 7. **Samples first.** [Order free samples](/swatches) of the fabric, then [price one window in 60 seconds](/quiz). Shipping is free Canada-wide. Every shade is custom made in Toronto, Ontario, with about 2 business days of processing, then typically 3 to 9 business days of standard delivery in Canada, as of October 2026 (details in our [shipping policy](/help/shipping-policy)). ## Motorized Blinds Buying Guide FAQ **How much do motorized blinds cost in Canada?**\ From us, as of 1 November 2026, at our sale price of 50% off retail: a motorized 36" × 60" roller shade runs $681.00 to $856.00 depending on fabric. The motor adds $495.00 to any roller or zebra shade, or $355.00 to a custom cellular. Remote $95.00 and hub $225.00, each bought once. [Get your exact price](/quiz). **Do motorized blinds work with Alexa and Google Home?**\ Ours do, through the Connector+ Hub ($225.00, one per home) and the free Smart Life app. There's no native Apple HomeKit support as of October 2026. **How long do motorized blind batteries last?**\ Up to 300 up/down cycles per charge, about six months with typical use. At four cycles a day, closer to every two and a half months. Charging is by cable with the shade in place. **Are motorized blinds worth the money?**\ For tall, unreachable or numerous windows, for accessibility, and for homes where the shades should follow a schedule, yes. For one easy-reach window on a budget, no; put the $495.00 into a better fabric. **Can motorized blinds be added to existing windows?**\ Yes. Our battery motors need no wiring, so they fit any existing window wide enough for the motor (from 19" on our cellular shades; the configurator checks rollers and zebras size by size). What we don't sell is a retrofit kit for a shade you already own; the motor is ordered as part of a new shade, as of October 2026. ## Automation You Can Price First Automation you can price before you fall in love with it. [Shop motorized](/motorized-solutions), or [price one room in 60 seconds](/quiz) and see if the morning-schedule life is for you.

Buying GuideHow-To
Read Article
Cellular Shades Buying Guide: Cell Sizes, Insulation Values and Cordless Options
11 min read

Cellular Shades Buying Guide: Cell Sizes, Insulation Values and Cordless Options

You've probably read that cellular shades are the "most energy-efficient" window covering. Then you went looking for the actual number and found a different R-value on every site, some of them suspiciously high. The claim is real. The numbers are a mess. This cellular shades buying guide sorts out the claim from the marketing. You'll see how the honeycomb works, what single cell and cell-in-cell really change, which performance numbers come from a lab and which come from a sales page, and what our cellular shades cost as of November 2026. We'll also tell you when a cellular shade isn't the right pick, because sometimes it isn't. ## How Honeycombs Insulate Look at a cellular shade from the side and you'll see why it's also called a honeycomb shade. The fabric is formed into a row of hollow cells, stacked from top to bottom. Each cell traps a pocket of air. Still air is a decent insulator. In winter, the pocket slows the heat leaving your room through the cold glass. In summer it slows the heat coming in. The same cells also soften outside noise. Here's the part that matters as much as the fabric: **air only helps if it stays put.** A cellular shade works best when it's closed and sits close to the window, with small gaps at the sides and bottom. Warm room air that slips around the edges touches the cold glass anyway. That's why fit, which we cover below, is part of the insulation story. And it's worth knowing how much is at stake. Natural Resources Canada says windows, doors and skylights can account for up to 35% of a house's total heat loss ([NRCan, "Keeping the Heat In," modified January 2025](https://natural-resources.canada.ca/energy-efficiency/home-energy-efficiency/keeping-heat-section-8-upgrading-windows-exterior-doors)). A shade won't fix a drafty window, but it is the cheapest layer you can add to the inside of the glass. ## Cell Sizes and Layers "Cell size" gets used for two different things: how big each honeycomb is, and how many layers of honeycomb there are. They're separate choices, so we'll take them one at a time. ### Cell size Cell size is how tall one honeycomb is, measured on the front of the shade from one crease line to the next. You'll also see it called pleat size. Across the industry the sizes you'll meet most often are 3/8", 9/16" and 3/4". What cell size mostly changes is the look. Small cells read as fine, tight pleats and suit smaller windows. Bigger cells look bolder and calmer on a large pane, with fewer pleats from top to bottom. For warmth, look first at the number of layers and at how well the shade fits, which come next. **How to measure cell size.** Lower the shade all the way and hold a tape measure flat against the front. Measure from one crease line to the next, without pulling the fabric, because a stretched cell measures bigger. On a fabric sample, lay it flat and measure one cell the same way. **Ours.** Our configurator doesn't list a cell size for each fabric. The quickest way to see one is a free sample: every fabric in the [cellular configurator](/shop/info/cellular) has a "Get Free Sample" button, and a ruler does the rest. ### Layers In the industry you'll see single cell, double cell and occasionally triple cell. More layers means more trapped air, more insulation, and usually a higher price and a slightly bulkier stack when the shade is raised. Here's what we actually make, as of 1 November 2026: **Single cell.** One layer of honeycomb. This is most of our range, in light-filtering fabrics (our configurator calls them Privacy), blackout fabrics and a few see-through ones. **Cell in cell.** A cell with a second cell inside it, so there's an extra layer of trapped air while the front still looks like a single row of cells. We make it in two lines, Loom Cell in Cell and Canopy Cell in Cell, and each comes in a light-filtering and a blackout (opaque) version. **Triple cell.** We don't make one. If a seller tells you triple cell is a must, ask them for the tested numbers behind that claim. Our honest verdict: **single cell is enough for most windows.** Choose cell in cell for your coldest rooms, a north-facing bedroom or a big pane you sit next to all winter. On the same 36" × 60" window, moving from single to cell in cell in the same fabric family added $56 to $129 per shade as of 1 November 2026, at the prices in the cost section below. ## The Honest Numbers This is where most guides go wrong, so we'll be careful. **There's one trustworthy rating, and it's AERC.** The Attachments Energy Rating Council certifies window coverings, including cellular shades. Its label gives each product a Cool Climate rating (heating savings) and a Warm Climate rating (cooling savings). Higher is better, and any rating above zero means savings compared with a bare window ([AERC, "Reading the Residential Label"](https://aercenergyrating.org/reading-the-residential-label/)). If a seller quotes a performance figure with no AERC rating or test behind it, treat it as marketing. **Why cellular shade R-values are all over the place.** R-value measures how well something resists heat flow: the higher the number, the better it insulates. Search for the R-value of cellular shades and you'll find figures that disagree, for three reasons. Some are for the shade alone and some are for the window and shade together. Single-cell and multi-layer shades are lumped together. And fit changes the result as much as fabric does, because a gap at the sides lets warm air reach the cold glass. Official raters mostly don't use R-value at all. Canada rates windows by U-factor, and Natural Resources Canada notes that the R-value "is not part of the energy performance standards" but "is often quoted by contractors and sales staff" ([NRCan, "Ratings and certification," modified 14 January 2025](https://natural-resources.canada.ca/energy-efficiency/products/windows-doors-and-skylights/rating-criteria-and-standards/13978)). An AERC label lists a U-factor too. With U-factor, lower is better. If you want to compare it with an R-value, R-value is 1 divided by the U-factor when both are in the same imperial units. **We don't publish an R-value or an AERC rating for our cellular shades.** We'd rather say that plainly than put a number on this page we can't back up. **What a real-world test found.** The best independent field test we know of comes from the US Department of Energy's Pacific Northwest National Laboratory. Researchers put opaque cellular shades in one of two identical test houses in a cold-winter climate, left the other house's windows bare, and measured the heating and cooling energy ([PNNL, "Evaluation of Cellular Shades in the PNNL Lab Homes," November 2016](https://www.osti.gov/biblio/1379449)). Opening and closing the shades on a schedule, the house with cellular shades used: - **14.4% less** heating and cooling energy in the heating season, compared with no window coverings - **16.6% less** in the heating season, compared with ordinary white vinyl blinds - **10.5% less** in the heating season, compared with vinyl blinds, when both stayed closed the whole time Read those numbers the right way. They describe a premium multi-layer shade from another manufacturer, on double-pane, aluminum-frame windows, in one climate. They show the effect is real and measurable. They don't promise your bill will drop by the same amount, and we won't promise you dollars either. A later US Department of Energy study, led by Oak Ridge National Laboratory in a test house in Knoxville, Tennessee from December 2019 to May 2020, compared five cellular shades with vinyl blinds. It found cellular shades saved up to 20% of heating energy and up to 15% of total heating and cooling energy, compared with no shades ([US DOE, "Interior Cellular Shades Boost Home Energy Performance," October 2021](https://www.energy.gov/sites/default/files/2021-12/bto-cellular-shades-factsheet-112221.pdf)). Same caution applies: other manufacturers' shades, an American climate, and "up to" means the best case. ## Options That Matter ### Cordless, by design Our custom cellular shade has no cords or chains. You choose between two controls: **Glide chainless.** Included in the price. You lift or lower the shade at the bottom rail, and a ZeroGravity™ spring balances the weight so it stays where you leave it. **Motorized.** A rechargeable motor you run from a remote, an app, or your smart home through the Connector hub, for shades 19" wide and up. See [motorized solutions](/motorized-solutions) for how it works. Motors make sense for high windows and for rows of shades, and they help with the closing habit that does the insulating. With no cord to tangle or loop, either control is a sensible choice in a home with young kids or pets. ### Duo Honeycomb (day and night) Our Essential Honeycomb line includes the Duo Honeycomb, a day-and-night shade: light-filtering fabric and room-darkening fabric in one dual-layer shade. Use the light-filtering half during the day and switch to the darker half at night. It's the most flexible cellular we make. ![A Duo Honeycomb day-and-night shade: light-filtering fabric on top, room-darkening fabric below](/images/newHome/shades/day_night_cellular.webp) ### Top-down bottom-up A top-down bottom-up shade can be lowered from the top, so you get daylight over the top while the bottom of the window stays covered. It's a great privacy option for street-level rooms. **We don't currently make cellular shades in top-down bottom-up, as of 1 November 2026.** If it's a must for you, Duo Honeycomb or a [zebra blind](/blog/zebra-blinds-buying-guide) are the closest things we offer. ### Blackout Both cell-in-cell lines, and four of our single-cell lines (Loom, Cane, Canopy and Shale), come in an opaque blackout version. Remember the edges, though: blackout fabric stops light passing through the fabric, not around it. ## Looks and Rooms As of 1 November 2026, our custom cellular configurator lists 57 fabric and colour combinations. Most are soft neutrals: white, linen, beige, taupe, grey, charcoal, plus a blue and a black. You can choose light-filtering, blackout, and a few more see-through fabrics like Crystal and Root. The headrail comes in white, anodized, linen or black. Our Essential Honeycomb line adds 22 more combinations across light filtering, blackout and Duo Honeycomb, including printed grey and printed taupe. Every product photo is a little off, so see the fabric in person. In the [cellular configurator](/shop/info/cellular), every fabric has a "Get Free Sample" button. Hold a sample up to your window and squeeze it gently to feel the cells. **Where cellular shines:** bedrooms, especially with blackout; cold rooms and big north-facing windows; basements; any room where warmth matters more than a view. **The honest nos:** - **Steamy bathrooms.** Our cellular fabrics are polyester, and our [5-year warranty](/help/warranty) doesn't cover damage from excessive humidity. A window beside a shower that fogs up daily is a tough spot for any fabric shade. A moisture-resistant roller is a better pick there; our [roller shades buying guide](/blog/roller-shades-buying-guide) covers the fabrics. - **Style-first living rooms.** If you want a crisp, modern look and the ability to see out with the shade down, a zebra usually wins. Our [zebra blinds buying guide](/blog/zebra-blinds-buying-guide) explains why. - **Windows you want to see through.** A cellular shade is either up or down. There's no view-through setting, so it isn't the right choice when you want to keep the view with the shade down. ## Cost and Payback These are our cellular prices as of **1 November 2026**, pulled from our live configurator that day. **Every price below is our sale price: 50% off our retail price.** Watch for promotions, which can take it lower still at checkout. Prices are per shade, in CAD. ### Custom Cellular With glide chainless control and a standard headrail, both included. The low number is our entry fabric (Loom, single cell); the high number is our top tier (Canopy Blackout Cell-in-Cell and Shale Blackout). - **24" wide × 36" tall:** $255 to $340 - **36" × 60"** (a typical bedroom window): $409 to $714 - **48" × 60":** $472 to $879 - **60" × 72"** (a typical living room window): $602 to $1,263 - **72" × 84":** $703 to $1,612 Motorized instead of glide chainless: +$355 per shade. Motor add-ons if you don't already have them: remote +$95, charger +$30, smart-home Connector +$225. Same date, same 50% off. Custom cellular shades are made from 12" to 96" wide and 6" to 96" tall. ### Essential Honeycomb Light filtering, blackout, then Duo Honeycomb, in that order. - **24" × 36":** $80 / $120 / $185 - **36" × 60":** $167 / $255 / $390 - **48" × 60":** $218 / $341 / $527 - **60" × 72":** $297 / $467 / $708 Essential Honeycomb is made from 18" to 72" wide and up to 72" tall, and it comes in one standard configuration, so there are no control or headrail choices. If your window fits those limits and you like one of its fabrics, it's the budget way into a honeycomb. Choose Custom for bigger windows, cell in cell, a headrail colour or a motor. Shipping is free Canada-wide. Every shade is custom made in our facility in Toronto, Ontario, with about 2 business days of processing, as of November 2026 (details in our [shipping policy](/help/shipping-policy)). ### Payback, honestly Buy a cellular shade for comfort first. The test results above show real savings, but we won't turn them into a payback date. Your windows, your heating system and how often you actually close the shade decide the result. What you'll notice the first winter is simpler: the chill near the glass eases, and the room feels warmer at the same thermostat setting. Your window won't be one of these sizes, and that's fine. [Get your price in 60 seconds](/quiz), or [shop cellular shades](/shop/info/cellular) and enter your real measurements. ## Cellular Shades Buying Guide FAQ **Do cellular shades really keep heat in?**\ Yes, when they're closed. In the PNNL test house, cellular shades cut heating-season HVAC energy by 14.4% compared with bare windows. Fit matters: the closer the shade sits to the glass, with small edge gaps, the better it works. **Is double cell worth it over single cell?**\ For your coldest rooms, often yes. For most windows, single cell does the job. Our version of the extra layer is cell in cell, which added $56 to $129 to a 36" × 60" shade as of 1 November 2026. **What's the difference between 9/16" and 3/4" cellular shades?**\ Mostly looks. A 3/4" cell is taller, so the shade has fewer, bolder pleats; a 9/16" cell looks finer. For warmth, look first at the number of layers and at how well the shade fits. **How do I measure the cell size of a honeycomb shade?**\ Lower the shade and measure on the front, from one crease line to the next, without stretching the fabric. On a sample, lay it flat and measure one cell. **What is the R-value of cellular shades?**\ There isn't one honest number. Published figures mix the shade alone with the window and shade together, mix single-cell with multi-layer shades, and ignore fit. An AERC rating is the reliable comparison. We don't publish an R-value for ours. **What is top-down bottom-up?**\ A shade that can be lowered from the top as well as raised from the bottom, so you get daylight above and privacy below. We don't make cellular shades in top-down bottom-up as of November 2026. **Are cellular shades good for bathrooms?**\ Not beside a shower. Our cellular fabrics are polyester, and our warranty excludes damage from excessive humidity. For a steamy bathroom, look at a moisture-resistant roller instead. **How much do cellular shades cost in Canada?**\ From us, as of 1 November 2026, at our sale price of 50% off retail: a 36" × 60" custom cellular shade runs $409 to $714, and an Essential Honeycomb shade of the same size runs $167 to $390. [Get your exact price](/quiz). ## Warm Windows, Honest Numbers Warm windows, honest numbers. [Shop cellular shades](/shop/info/cellular) sized for Canadian winters, or [get your price in 60 seconds](/quiz). Want to measure first? Our [foolproof measuring guide](/blog/how-to-measure-windows-for-blinds) takes about ten minutes.

Buying GuideEnergy
Read Article
Roller Shades Buying Guide: Blackout vs. Light Filtering vs. Sheer (With Room-by-Room Picks)
12 min read

Roller Shades Buying Guide: Blackout vs. Light Filtering vs. Sheer (With Room-by-Room Picks)

You've decided on roller shades. Good call: one flat panel of fabric, nothing to tilt, and it disappears almost completely when you raise it. Then you open a configurator and the simple choice turns into a wall of words. Blackout, privacy, translucent, sunscreen, transparent, 1%, 3%, cassette, open roll, reverse roll. This roller shades buying guide gets you through that wall in order. First, what each opacity really does, including at night, which is the part most guides skip. Then fabric, hardware, a verdict for every room, real prices, and a checklist. Every product detail comes from our own [roller shades](/shop/info/roller) page and live configurator as of November 2026, and every price is dated. ## The Opacity Ladder Opacity is how much light the fabric lets through when the shade is down. It's the most important choice you'll make, and the names are where most of the confusion comes from, because the industry doesn't agree on them. Here are the five fabric groups our configurator offers for rollers, from most see-through to least, with the everyday names you'll see elsewhere. **1. Transparent (often sold as "sheer").** See-through fabric. With the shade down you still see out clearly, and the room stays bright. It softens and diffuses light rather than blocking it. Think of it as a tidier alternative to sheer curtains. Our range includes Essential Sheer, Sunlit Sheer, Serene Sheer, Soft Sheer, Softline and Wicker. **2. Sunscreen (also called solar screen).** A woven fabric with a stated "openness": the percentage of the weave that's open. We make rollers in 1%, 2%, 3%, 5% and 10% openness. A lower number blocks more sun and glare and gives you less view. A higher number keeps more view. Sunscreens cut glare and UV while letting you see outside, which is why offices love them. **3. Translucent (the industry's "light filtering").** The fabric glows. Daylight comes through soft and even, but you can't see through it. Our range includes Luma, Linear, Riviera, Sierra and Shoreline Light Filtering. **4. Privacy (roughly what others call "room darkening").** A denser fabric that takes a real bite out of the sunlight and gives you privacy from the street. The room gets noticeably dimmer, but it's not dark. Our range runs from Everyday Privacy up to options like Somerset Privacy and Magnolia Privacy. **5. Blackout.** Opaque fabric that stops light passing through. Our blackouts are built from multiple layers, and the dense layers also help insulate against heat transfer and block UV. Our range starts at Palace and Everyday Blackout and runs up to options like Aegean Blackout and Rush Blackout. ### Blackout doesn't mean pitch black A blackout *fabric* blocks light. A blackout *window* also depends on the edges. Any roller has small gaps at the sides, and an open roll leaves the top of the fabric exposed. You can see both in the photo at the top of this page. If you need real darkness, pair a blackout fabric with a cassette (it covers the roll at the top) and read our guide to [inside vs outside mount](/blog/inside-mount-vs-outside-mount-blinds). An outside mount overlaps the frame and cuts the side gaps. ## Privacy Truth Table This is the section we wish every shade company published. How private a fabric is depends on which side is brighter. During the day, the outside is brighter, so people outside see a bright fabric, not your room. At night with your lights on, that flips. **Transparent (sheer)**\ Day: some privacy from the glow of the fabric, but people close to the window can see in.\ Night with lights on: **no privacy.** People outside can see into the room. **Sunscreen (1% to 10%)**\ Day: good privacy. You see out; it's hard for anyone to see in.\ Night with lights on: **no privacy.** The see-through effect reverses and people outside can see in. A lower openness helps a little. It doesn't fix it. **Translucent (light filtering)**\ Day: private.\ Night with lights on: **silhouettes only.** People outside can't see detail, but they can see shapes moving against the light. **Privacy**\ Day: private.\ Night with lights on: private. You'll see a glow from outside, not the room. **Blackout**\ Day and night: fully private. The rule to take away: **light filtering does not give you night privacy, and neither do sunscreens.** If a street-facing room needs to be private in the evening, choose privacy or blackout fabric, or add a second layer. Or look at a [zebra blind](/blog/zebra-blinds-buying-guide), which switches from view-through to private in one shade. ## Fabric & Colour Logic Once you know your opacity, you're choosing within it. As of 1 November 2026, our roller configurator lists 262 fabric-and-colour combinations across the five groups, from white, linen and beige through grey, charcoal, taupe and brown to black, with blues and a green in the mix. **Solids vs textures.** A smooth solid reads clean and modern and shows the most consistent colour. A textured weave adds depth, and it looks different up close than it does in a photo, which is one more reason for samples. **Light or dark sunscreen.** On a sunscreen, colour changes how the fabric behaves. A darker screen is generally easier to see through from inside. A lighter one looks brighter from inside and reflects more of the sun. For view, go dark. For a bright, airy room, go light. **The street side matters in condos.** From outside, people see the back of your shade. Some buildings have rules about what colour faces the street, and white is common. A few of our fabrics are built for this: two of our premium sunscreens are sold as white-backed, and the configurator names them that way. Our [condo guide](/blog/measuring-blinds-condo-concrete-strata) covers how to check your building's rules before you order. **Wet rooms need the right fabric.** For a bathroom or a spot near the kitchen sink, choose a fabric that shrugs off moisture. Our Vinyl Blackout is a 3-ply PVC and fiberglass fabric, and many of our sunscreens are PVC blends. Be aware of one limit: our [5-year warranty](/help/warranty) doesn't cover damage from excessive humidity. A window right next to a shower that fogs up daily is a tough spot for any fabric shade. **Certifications, if they matter to you.** Many of our roller fabrics carry Greenguard or Oeko-Tex Standard 100, and some add fire ratings such as NFPA 701. The configurator shows which ones. Colour on a screen is never quite right. The only reliable test is holding the fabric against your own window. [Order free samples](/swatches): up to five, with free standard shipping in Canada, as of November 2026. Check them at noon and again at night with the lights on. That second check is where the privacy truth table stops being theory. ## Hardware Choices The fabric sets the light. The hardware sets the look and how you use it every day. ### Open roll or cassette **Open roll.** The fabric rolls around a visible tube with no cover. It's minimalist, it costs nothing extra, and it's the only option that offers a **reverse roll**. A reverse roll conceals the tube and keeps the fabric from touching window cranks and other obstacles. **Cassette.** An aluminum box that encloses the roll. We make rollers with compact and full-size cassettes, in a curved or square profile, in a matte metal finish or with the front wrapped in the same fabric as the shade. A cassette gives a finished look and covers the light gap at the top, which matters in a bedroom. Cassette prices are in the cost section below. If your window has cranks, choose open roll with a reverse roll. If it's a bedroom with blackout fabric, a cassette earns its money. ### Chain, chainless or motorized **Chain.** Included in the price. A clutch and chain system, with a stainless steel or coloured plastic chain. Every chain-operated roller shade we make includes the Safety Shield child safety device. **Glide chainless.** No chain at all. You raise and lower the shade by hand at the bottom bar, and a ZeroGravity™ spring balances the weight so it stays where you leave it. **Motorized.** A rechargeable motor you control with a remote, an app, or your smart home through the Connector+ Hub. See [motorized solutions](/motorized-solutions) for how it works. **Our advice: go cordless where there are kids or pets.** Chain is the budget choice, and it comes with a safety device. But if young children or pets share the room, choose glide chainless or motorized and remove the chain completely. Motorized is also the answer for tall windows, hard-to-reach windows and rows of shades you want to move together. ## Room-by-Room Picks Here's a verdict for each room, including the honest ones where a roller isn't the best pick. ### Bedroom: blackout, with a cassette Sleep is the job. The Sleep Foundation's guidance (updated June 2026) is that darkness is best for sleep, because light slows or stops the brain's melatonin production ([Sleep Foundation, "Light and Sleep"](https://www.sleepfoundation.org/bedroom-environment/light-and-sleep)). So choose blackout fabric, add a cassette to close the top gap, and consider an outside mount if you want the sides as dark as possible. If you want a warmer, insulating look, a blackout [cellular shade](/shop/info/cellular) is worth comparing. ### Living room: translucent or sunscreen, or a zebra Daytime is about light and view, so a translucent fabric or a 5% sunscreen suits most living rooms. Evenings are where you need to be honest with yourself. Neither gives you night privacy. If the room faces the street and you sit in it at night with the lights on, you have two choices. You can choose a privacy fabric, or you can choose a [zebra shade](/shop/info/zebra), which gives you the view by day and closes to private at night in one shade. That's a case where we'd point you away from a roller. ### Kitchen and bathroom: moisture-friendly fabric Vinyl Blackout where you need full privacy, or a PVC-blend sunscreen where you want light and a view. Keep the warranty's humidity limit in mind for a window right beside the shower. ### Home office: sunscreen Screen glare is the enemy. A 3% sunscreen is a strong all-rounder. Go to 1% for a west-facing room with harsh afternoon sun, or 5% if you'd rather keep more of the view. Pick a darker colour for a clearer view out. ## What Rollers Cost These are our roller prices as of **1 November 2026**, pulled from our live configurator that day. **Every price below is our sale price: 50% off our retail price.** Watch for promotions, which can take it lower still at checkout. Each price is for one shade, in CAD, with chain control and an open roll. The low number is our entry fabric tier; the high number is our top tier. - **24" wide × 36" tall** (a small bathroom or basement window): **$88 to $146** - **36" × 60"** (a typical bedroom window): **$186 to $361** - **48" × 60"** (a wider bedroom or den window): **$236 to $472** - **60" × 72"** (a typical living room window): **$291 to $630** - **72" × 84"** (a large living room or condo pane): **$422 to $901** ### What changes the price **Fabric tier, not opacity.** Price follows the fabric's tier, and every opacity comes in several tiers. On a 36" × 60" window on the same date, the cheapest privacy, sunscreen and blackout fabrics all started at $186. The cheapest translucent and transparent fabrics started at $230, as did Everyday Blackout. **Size.** Price climbs in steps with width and height, so a shade a couple of inches bigger can land in the next step. **Control, per shade, same date, at the same 50% off:** - **Chain:** included - **Glide chainless:** +$140 - **Motorized** (rechargeable): +$495 - Motor add-ons if you don't already have them: remote +$95, charger +$30, smart-home Connector +$225 **Cassette, on a 36" wide shade, same date and pricing:** compact cassette +$104, full-size cassette +$133, fabric-wrapped compact +$153, fabric-wrapped full-size +$182. Curved and square profiles cost the same. Cassette prices change with width. Shipping is free Canada-wide. Every roller is custom made in our facility in Toronto, Ontario, with about 2 business days of processing, then typically 3 to 9 business days of standard delivery in Canada, as of November 2026 (details in our [shipping policy](/help/shipping-policy)). Your window won't be one of these five sizes, and that's fine. [Get your price in 60 seconds](/quiz), or [shop roller shades](/shop/info/roller) and type your real measurements into the configurator. The price updates as you choose. ## The Roller Shades Buying Guide Checklist 1. **Measure.** Width at the top, middle and bottom; height at the left, middle and right. Our [foolproof measuring guide](/blog/how-to-measure-windows-for-blinds) walks through it. Choose Inside Mount and we deduct 1/8" from the width for clearance, so don't subtract anything yourself. 2. **Pick inside or outside mount.** Inside looks tidy in the frame; outside cuts light gaps. [Inside vs outside mount](/blog/inside-mount-vs-outside-mount-blinds) helps you decide. 3. **Choose opacity by room, then check the night.** Use the privacy truth table. Street-facing rooms used at night need privacy or blackout. 4. **Get samples.** Up to five [free samples](/swatches). Look at them in daylight and at night with the lights on. 5. **Choose the hardware.** Open roll (reverse roll if you have cranks) or a cassette. Chain, glide chainless or motorized, and go cordless around kids and pets. 6. **Pick the control side.** You choose it when you order, so pick the side you'll actually reach. 7. **Plan the install.** Most rollers go up in about 15 minutes. Our [roller shade install guide](/blog/how-to-install-roller-shades) shows every step. 8. **Know your safety net.** Our [5-year warranty](/help/warranty) covers manufacturing defects, and [ordering custom blinds online](/blog/ordering-custom-blinds-online) explains what happens if a measurement goes wrong. ## Roller Shades FAQ **What is the difference between blackout and room darkening?**\ Blackout fabric is opaque: it stops light passing through the fabric. "Room darkening" is a looser industry term for fabric that blocks most light but not all. In our range, the closest match is our privacy fabrics. Either way, remember the edges: side and top gaps let light in unless you use a cassette or an outside mount. **Can you see through light filtering shades at night?**\ Not clearly, but they aren't private either. With your lights on, people outside can see silhouettes and movement through a translucent (light filtering) fabric. Sunscreen and sheer fabrics are worse: people can see into the room. For night privacy, choose privacy or blackout fabric. **What roller shade is best for bedrooms?**\ Blackout fabric with a cassette, and an outside mount if you want the sides as dark as possible. It's the closest a roller gets to a dark room. **Are cassette roller shades worth it?**\ In bedrooms, yes: a cassette covers the light gap at the top and hides the roll. Elsewhere it's mainly about looks. As of 1 November 2026, a compact cassette adds $104 to a 36" wide shade at our sale price. **How much do custom roller shades cost in Canada?**\ From us, as of 1 November 2026, at our sale price of 50% off retail: $186 to $361 for a 36" × 60" window with chain control and an open roll. [Get your exact price](/quiz) for your own window. ## Ready When You Are Five opacities, one honest ladder, and a factory that cuts them to your window. [Shop roller shades](/shop/info/roller) or [get your price in 60 seconds](/quiz). Not sure yet? [Order free samples](/swatches) and hold them up to your own window, or see a roller on a photo of it with our free [blinds visualizer](/visualizer).

Buying GuideHow-To
Read Article
Zebra Blinds Buying Guide 2026: Fabrics, Opacity, Cost and What to Avoid
12 min read

Zebra Blinds Buying Guide 2026: Fabrics, Opacity, Cost and What to Avoid

You saw them in a friend's condo, or in a feed, or in a showroom window: stripes that slide past each other and turn a window from open to private without the shade moving an inch. Zebra blinds make a lot of people nervous for the same three reasons. How do they actually work, what should they cost, and will the stripes stay lined up? This guide answers all three, plus the one worth asking before any of them: when a zebra is the wrong shade for your window. Every price below comes from our own live configurator and is dated. Every product detail comes from our own [zebra shades](/shop/info/zebra) page and factory sheets, current as of November 2026. ## Zebra Blinds in 60 Seconds A zebra blind (the industry also calls it a banded shade, and we sell it as a zebra shade) is one long loop of fabric with alternating horizontal stripes: a sheer band, then a solid band, then a sheer band, all the way down. The loop hangs from a roller at the top, so there are two layers of that striped fabric hanging in front of your window: one in front, one behind. Move the shade and the two layers slide past each other. That gives you three positions: - **Open (bands aligned).** Sheer lines up with sheer and solid lines up with solid. Light and view come through the sheer stripes. - **Closed (bands offset).** The solid bands on one layer cover the sheer bands on the other. The view is gone and the room gets private. - **Rolled up.** Keep going and the whole thing rolls away into the cassette at the top, like a roller shade. Everything in between is yours to choose. That in-between is what people are really buying: light and privacy control in one continuous adjustment, without tilting slats or lifting a whole shade. On our zebras, the bottom bar is part of that mechanism. It's an aluminum bar designed for banded shades, and it has an internal roller that the banded fabric glides through. It holds the two layers together and keeps them aligned. ## Opacity Choices: Privacy vs Blackout Bands On nearly every zebra fabric the sheer band is transparent. The choice you're really making is the **solid band**. As of November 2026 our configurator offers two groups: - **Privacy.** The solid bands are a privacy-weight fabric. Closed, the room is shaded and soft light still comes through. This is the everyday choice for living rooms and home offices. - **Blackout.** The solid bands are opaque. Closed, those bands block light rather than filtering it. This is the choice for bedrooms, media rooms and west-facing glare. ![A grey blackout zebra shade with the bands open: the pale stripes are the sheer bands, the grey ones are solid](/images/newHome/shades/blackout_zebra.webp) ### The night-privacy truth Here's the part a lot of product pages leave out. **In the open position, the sheer bands are see-through, and they're see-through in both directions.** During the day, the bright side is outside, so you see out much more easily than anyone sees in. At night with your lights on, that flips. Anyone outside can see into your room through the sheer stripes. The fix is simple, but you have to do it: at night, close the shade so the solid bands cover the sheers, or roll it fully down in the closed position. A zebra gives you excellent night privacy **when it's closed**. It doesn't give you night privacy with the bands open, whatever fabric you pick, and nobody should tell you otherwise. ### Blackout zebra vs true blackout A blackout zebra darkens a room well. It isn't the same as a blackout roller shade, for two plain reasons. The fabric is two striped layers passing each other, not one solid sheet. And any inside-mounted shade leaves a small gap at each side. If "pretty dark" is the goal, a blackout zebra is great. If you work nights and need pitch-black, read the section on where zebras don't win before you order. ## Fabric & Colour Selection As of November 2026 we make zebras in 61 fabric-and-colour combinations across four price tiers. The colour families run from white, linen and beige through taupe, grey and brown to black. Tier 1 is our entry range (Wales and Cloudweave Privacy, both privacy fabrics). The tiers above it add more textures and the blackout options, starting with Sonoma in tier 2. Three things are worth knowing before you fall for a swatch on screen: **Colour on a screen lies.** Your monitor, your phone and the light in your room all shift a colour. A grey that looks cool on your laptop can read warm next to your floors. We say this about every product, and it matters more on zebras because you see the fabric twice, once through the other layer. **Think about the street side.** From outside, people see the back of the fabric. If you're in a condo, your building may have rules about what colour faces the street. Our [condo measuring guide](/blog/measuring-blinds-condo-concrete-strata) covers how to check before you order. **Look at the certifications if they matter to you.** Several of our zebra fabrics carry Greenguard certification, and some add Oeko-Tex Standard 100 or an NFPA 701 fire rating. The fabric details in the configurator list which ones. The cheapest way to stop worrying about all of this is to hold the fabric against your own window. You can [order free fabric samples](/swatches): up to five, with free standard shipping in Canada, as of November 2026. Put them against the glass at noon and again at night with the lights on. Five minutes with a real swatch beats an hour of zooming in on photos. ## What Zebra Blinds Cost in 2026 Here is what zebra blinds cost from us, as of **1 November 2026**. We pulled these from our live configurator that day. **Every price below is our sale price: 50% off our retail price.** Watch for promotions, which can take it lower still at checkout. Each price is for one shade, in CAD, with a chain control and our standard compact curved cassette. The low number is our entry fabric tier; the high number is our top tier. - **24" wide × 36" tall** (a small bathroom or basement window): **$227 to $305** - **36" × 60"** (a typical bedroom window): **$351 to $590** - **48" × 60"** (a wider bedroom or den window): **$430 to $744** - **60" × 72"** (a typical living room window): **$552 to $1,062** - **72" × 84"** (a large living room or condo pane): **$675 to $1,365** ### What changes the price **Size.** Price climbs in steps with width and height, so a shade a couple of inches bigger can land in the next step up. **Fabric tier.** On a small window the tier barely matters: $78 between entry and top on a 24" × 36". On a big window it roughly doubles the price. Samples are how you decide whether the top tier is worth it for your room. **How you operate it.** Upgrades on the same day, per shade, at the same 50% off: - **Chain:** included - **Glide chainless manual** (you move the bottom bar by hand; no chain): **+$140** - **Motorized** (rechargeable motor): **+$495** - Motor add-ons if you don't already have them: remote **+$95**, charger **+$30**, smart-home Connector **+$225** **Cassette style.** The prices above use the compact curved cassette. Other cassettes cost a little more; on a 36" wide shade, as of the same date, a full-size curved or square cassette adds $29, a fabric-wrapped compact cassette adds $49, and a fabric-wrapped full-size one adds $78. Shipping is free Canada-wide, and you install it yourself: a roller-style install, covered in the checklist below. Your window isn't one of these five sizes, and that's fine. [Get your exact price in 60 seconds](/quiz). Or go straight to [shop zebra shades](/shop/info/zebra) and put your real measurements into the configurator. The price updates as you choose. ## The Quality Difference Search for zebra blinds and you'll see prices from about the cost of a takeout order to several hundred dollars, for products that look almost identical in a photo. Photos hide the parts where a zebra is made well or badly. When you compare any two zebras, including ours, these are the questions worth asking. **Is it made to your size, or cut down from stock?** A shade built to your measurements fits the opening. A standard size trimmed to "close enough" leaves gaps, or leaves you trimming it yourself. Ours are custom made in our own facility in Toronto, Ontario, and as of November 2026 orders are typically ready to ship within 2 business days. **What keeps the bands aligned?** Alignment is the thing people worry about most, and it comes down to hardware and installation, not luck. On our zebras, the aluminum bottom bar is designed for banded shades and holds the two fabric layers together with an internal roller. The rest is a level install. We wrote a whole guide on [how to install zebra blinds](/blog/how-to-install-zebra-blinds) with the levelling trick that keeps bands straight. **What's covering the roller?** Every zebra we make comes in a cassette, the enclosed box at the top. There's no open-roll zebra in our range. A cassette hides the rolled fabric and the hardware, and it's the difference between a finished window and a visible tube. **What's the fabric, and what's it certified to?** Ask what the fabric is and whether it has any certifications. Ours are listed with their composition and ratings in the configurator. **What happens if something's wrong?** This is the one people forget until they need it. For us: if a shade arrives damaged or doesn't match the dimensions you gave us because of a manufacturing defect, we repair or replace it free of charge, and our [5-year warranty](/help/warranty) covers manufacturing defects in materials and workmanship. If *you* measured wrong, our Fit Guarantee gives you 30 days from delivery to contact us, with one complimentary adjustment or remake per eligible shade, up to four shades per household. Full terms are on our [Fit Guarantee page](/help/return-policy#fit-guarantee), and [ordering custom blinds online](/blog/ordering-custom-blinds-online) walks through how it all works. A lower price isn't automatically a worse shade. It usually means one of those questions has a worse answer. Find out which one before you buy. ## Where Zebras Win (and Where They Don't) ### Where zebra blinds win **Living rooms.** This is the zebra's home ground. You want daylight and a view most of the day, privacy in the evening, and one shade that does both without being raised and lowered constantly. **Condos.** Big panes of glass and neighbours across the way make a condo the place privacy that you can dial in earns its keep. A zebra looks tidy in a row of matching windows too. **Home offices.** Screen glare moves with the sun. Nudging the bands a few degrees fixes it without losing the room's light. **Anywhere you'd otherwise hang two shades.** Some people put a sheer and a blackout on the same window to get day and night control. A zebra does a version of that in one shade. ### Where zebra blinds don't win **Bedrooms that need true darkness.** If you sleep during the day or need a pitch-black room, choose a [blackout roller shade](/shop/info/roller) with a cassette over a zebra. It's one solid layer of opaque fabric instead of two striped ones. A blackout zebra is a good bedroom shade for most people. It isn't a blackout room. **Steamy bathrooms.** Our warranty doesn't cover damage from excessive humidity. A small, well-ventilated bathroom window is usually fine. A window right beside a shower that fogs daily is a place to think twice about any fabric shade. **Windows you want to forget about.** Zebras reward fiddling. If you'd rather set a shade once and leave it, a plain roller shade is the simpler choice. **Very small or very large openings.** Every product has size limits. If your window is at either extreme, check that the configurator accepts your size before you fall in love with a fabric. ## Zebra Blinds Buying Checklist Before you order, run through this list: 1. **Measure properly.** Width at the top, middle and bottom, and height at the left, middle and right. Use the smallest numbers for an inside mount. Our [foolproof measuring guide](/blog/how-to-measure-windows-for-blinds) walks through every step, and [inside vs outside mount](/blog/inside-mount-vs-outside-mount-blinds) helps you pick. When you choose Inside Mount, we automatically deduct 1/8" from the width for clearance, so don't subtract anything yourself. 2. **Check your depth.** Zebras always come with a cassette, so make sure the window recess is deep enough for an inside mount. If it isn't, plan an outside mount. 3. **Get samples.** Order up to five [free fabric samples](/swatches) and check them against your window in daylight and at night. 4. **Pick the band.** Privacy for living spaces, blackout for bedrooms. Remember: close it at night. 5. **Choose the control side.** Decide which side the chain or motor sits on. It's chosen when you order, not adjusted on the wall, so pick the side you'll actually reach. 6. **Decide on chain, chainless or motorized.** Chain is included. Glide chainless is cleaner and has no cord. Motorized is the one to choose for tall, wide or hard-to-reach windows. See our [motorized solutions](/motorized-solutions) if you're weighing it up. 7. **Plan the install.** It's a roller-style install with two extra rules: level brackets and a clean cassette snap. Our [installation guide](/guides/installation-guide) has the sheets for your hardware. ## Zebra Blinds FAQ **What are zebra blinds and how do they work?**\ A zebra blind is a loop of fabric with alternating sheer and solid horizontal bands, hanging in two layers from one roller. Line the bands up and light and view come through the sheer stripes. Offset them and the solid bands close off the view. Roll it up and it disappears into the cassette. **Are zebra blinds good for privacy at night?**\ Yes, when they're closed. With the bands open, the sheer stripes are see-through, and at night with your lights on people outside can see in. Close the shade so the solid bands cover the sheers and you get full privacy. **How much do zebra blinds cost in Canada?**\ From us, as of 1 November 2026, at our sale price of 50% off retail: $351 to $590 for a 36" × 60" window with chain control and a compact cassette. Motorizing adds $495. [Get your exact price](/quiz) for your own sizes. **Do zebra blinds go out of alignment?**\ Not on their own. Alignment comes from the bottom bar holding the two layers together and from level brackets. Most "misaligned" zebras are installed out of level. Our [zebra install guide](/blog/how-to-install-zebra-blinds) shows how to get it right. **Are zebra blinds good for bedrooms?**\ With blackout bands, yes for most people: closed, they darken a room well. If you need true pitch-black darkness, a blackout roller shade with a cassette is the stronger choice. **Why are some zebra blinds so cheap?**\ Usually because something is missing: made to a stock size rather than yours, lighter fabric, no cassette, or thinner hardware and guarantees. Ask what size it's made to, what holds the bands aligned, and what happens if it arrives wrong. ## Ready to Choose Yours You now know more about zebra blinds than most people selling them. [Shop zebra shades](/shop/info/zebra), made to measure and shipped from our Toronto factory, or [get your exact price in 60 seconds](/quiz). Still deciding on colour? [Order free samples](/swatches) first, and see how a zebra looks on a photo of your own window with our free [blinds visualizer](/visualizer).

Buying GuideHow-To
Read Article
Measuring for Blinds in a Condo: Concrete Ceilings, Window Frames and Strata Rules
8 min read

Measuring for Blinds in a Condo: Concrete Ceilings, Window Frames and Strata Rules

Most measuring guides assume a house. Then you get the keys to a unit on the 31st floor and find a wall of glass, a concrete ceiling, a metal frame and a binder of building rules. Condo blinds installation is not harder than a house. It is different in three specific ways, and once you know them the job is very doable. Here are all three, written for Toronto towers by a company that makes its shades in Toronto. New to measuring? Keep [the foolproof measuring guide](/blog/how-to-measure-windows-for-blinds) open alongside this one. ## Condo Windows Are Different **1. The structure is concrete.** In most high-rises the ceiling is a poured concrete slab, and often the walls around the windows are too. Screws do not go into concrete the way they go into wood. **2. The windows sit in pockets and walls of glass.** Instead of a trimmed window with a sill, you often get floor-to-ceiling glass divided by vertical metal mullions, set into a drywall recess or under a bulkhead. That changes where a shade can mount and how you measure for it. **3. The building has rules.** A condo corporation's governing documents can control what residents do in their units, and window coverings are a common subject. Not a reason to panic — a reason to check before you order. ## Condo Blinds Installation Starts With Measuring the Pocket A window pocket is the recess the glass sits in, or the boxed-in space above it where a shade tucks out of sight. Measure it as an inside mount. **Width.** With a metal tape, measure the inside width at the top, the middle and the bottom. Write down the **narrowest**, rounded down to the nearest 1/8 inch. Do not subtract anything: as of September 2026, when you choose Inside Mount we automatically deduct 1/8 inch from the width for clearance. **Height.** Measure from the top of the pocket to where the shade should stop, at the left, middle and right, and record the **shortest**. On floor-to-ceiling glass, "where it should stop" is a decision, not the floor. Look for anything the shade could land on — a heating unit, a sill, a vent — and stop above it. **Depth.** The one condo owners skip, and the one that decides everything. Our [measuring guide](/guides/measuring-guide) puts the usual minimum for an inside mount at about 2 inches of flat depth, and asks you to check the product page — especially if you want a cassette, the enclosed box at the top of the shade. Shallower than that, and you are looking at a ceiling or wall mount instead. **Handles and cranks.** If a window handle sticks out into the shade's path, a [reverse roll](/blog/ordering-reverse-roll-shades) sends the fabric down the front of the tube, further from the glass, which can clear it. ### One wide shade or one per section Floor-to-ceiling glass usually comes split by mullions into several panes. You can cover the whole run with one shade or give each section its own. What decides it: - **Size limits.** Every product has a maximum width and height, and our customizer checks your numbers as you type. For example, as of September 2026 our [Cellular shades](/shop/info/cellular) take widths from 12 to 96 inches and [Simply Cellular](/shop/info/simply-cellular) from 18 to 72. - **Where the joins land.** If you split, line the shade edges up with the mullions. The mullion hides the gap between two shades. - **How you live.** Separate shades let you close the one facing the afternoon sun and leave the rest open. One shade is simpler, but it is all or nothing. - **Reach.** On tall glass, some shades end up behind a sofa or out of easy reach. That is what our [motorized shades](/motorized-solutions) are for: rechargeable motors with USB-C charging, and remotes that run shades individually or in groups, up to 16 channels. Measure each section and the full run, and write both down — our [measuring worksheet](/guides/measuring-guide) has room for it. Measure every window in the unit, even the ones that look identical. ## The Drilling Question Every bracket needs screws, and so does the child-safety device that keeps a chain or cord taut — our install sheets anchor it to the window frame or the wall. So the real question is what those screws go into. **Find out what is above the window.** Knock on it. Drywall sounds hollow; concrete sounds dead. Many condos have a **drywall bulkhead** above the windows — a boxed-in section that looks like ceiling. It is not solid, and it can hide ductwork, wiring or sprinkler lines. Do not drill blind into a bulkhead. If you are unsure what is behind it, ask property management before you make a hole. **If it is concrete, it is real work, not a problem.** A slab takes a hammer drill, a masonry bit, and plugs or anchors rated for the load. Expect dust, noise and a slower first bracket. Some buildings restrict drilling into concrete or limit noisy work to certain hours, so check first. **Where brackets can go.** Our install sheets show brackets mounted inside a window frame, on a wall or the front of a moulding, or on a ceiling. Cassette brackets go on a ceiling or a wall, with about 1/4 inch of clearance from the wall (ceiling mount) or the ceiling (wall mount). The sheets deliberately do not name an anchor type, because the right one depends on your surface. **About the metal window frame itself:** our install sheets do not cover drilling into a metal condo window frame, and we are not going to pretend they do. Whether you are allowed to alter it at all depends on your building's documents. Ask your management office first and [ask us](/contact) second, before you drill. **When to hire a handyman.** No hammer drill, every bracket going into concrete, or wide shades 9 feet up — paying someone for an hour or two is the right call. Everything after the holes — brackets, clicking the shade in, the safety device — is on our [installation guides](/guides/installation-guide) page and in our [roller shade walkthrough](/blog/how-to-install-roller-shades). ## Building Rules, Handled Condos in Ontario run on governing documents: the declaration, the by-laws and the rules. According to the Condominium Authority of Ontario (checked September 2026), rules define how units and common elements can be used and must be reasonable, and where documents conflict, the Condominium Act comes first, then the declaration, the by-laws and the rules. In a British Columbia strata the names differ, but the idea is the same: your building's documents decide. For blinds, in practice: - **Buildings commonly regulate how windows look from the street.** The usual version asks for a white or neutral colour on the side of the covering that faces outside. Common, not universal — some buildings say nothing. - **Some also regulate drilling, window frames or contractor hours.** - **The only version that counts is yours.** Owners can request copies of the rules from their condo corporation; the Condominium Authority of Ontario points to its Request for Records form for this. Renting? Ask your landlord — the rules apply to residents, not just owners. This is general information, not legal advice. Your documents and your property manager are the authority. One practical tip: when your [free samples](/swatches) arrive, look at the back of each one, not just the front. The back is what the street sees. ## No-Drill Reality Check We do not sell a no-drill mount for our shades and have not tested one, so we will not recommend a product. What we can tell you is what the mount has to survive. A custom shade on a tall condo window is real weight hanging off its brackets, pulled up and down every day, next to a large pane of glass that runs hot in summer and cold in winter. Anything holding by pressure or adhesive instead of a screw has to handle all of that. If drilling is what is stopping you, the more useful moves are: find out exactly what your building restricts, look for a surface you *can* screw into, or book the one-hour handyman. And note that our 5-year warranty covers manufacturing defects, not problems caused by improper installation. ## The Condo Shortcut You do not need a special condo product. You need the right numbers and a shade made to them. 1. **Order up to five [free samples](/swatches).** Tape them to the glass, check them against your mullions at noon and at dusk, and look at the backs. 2. **Measure the pocket, the depth and every section**, with [inside or outside mount](/blog/inside-mount-vs-outside-mount-blinds) decided. 3. **Bring your questions to the showroom** if you are nearby: 50 Hollinger Road, Toronto, walk-ins welcome Monday to Friday, 8:30am to 5:00pm ET, as of September 2026. [Plan a visit](/showroom). 4. **Order.** As of September 2026, shades are made in our own Toronto facility, typically ready to ship within 2 business days, with free standard shipping across Canada. Mis-measure anyway? Contact us within 30 days of delivery: our Fit Guarantee covers one complimentary adjustment or remake per eligible shade, up to four shades per household. Details on our [Fit Guarantee page](/help/return-policy#fit-guarantee). ## Frequently Asked Questions **Can you drill into concrete condo ceilings for blinds?**\ Usually, yes — with a hammer drill, a masonry bit and anchors rated for the load. Check your building's rules first, and make sure you are drilling into the slab, not a drywall bulkhead that could hide pipes or wiring. **Do condos require white blinds?**\ Not universally. Many buildings ask for a white or neutral street-facing side; some have no rule. Request a copy of your building's rules before you order. **How do you measure floor-to-ceiling condo windows?**\ Measure each section between mullions and the full run. For an inside mount, send the narrowest width and shortest height, rounded down to 1/8 inch, without deducting — we take 1/8 inch off the width. Check the pocket depth and stop the shade above the floor or any heater. **Do no-drill blinds work in condos?**\ We do not sell or test a no-drill mount, so we will not vouch for one. A custom shade on a tall window is heavy and used daily, which is a lot to ask of pressure or adhesive. **Can blinds mount to condo window frames?**\ Our install sheets show brackets mounted inside a window frame, but they do not cover drilling into metal condo frames, and your building may not allow it. Check with management first, then [ask us](/contact). ## Ready When Your Windows Are Your building has rules, your ceiling is concrete, and your windows are gorgeous anyway. Start with [free samples](/swatches), [get a price in about 60 seconds](/quiz), or [shop custom shades](/shop) — measured for towers, made in Toronto.

How-ToMeasuring
Read Article
Ordering Custom Blinds Online: How It Works, What Can Go Wrong, and Our Fit Guarantee
9 min read

Ordering Custom Blinds Online: How It Works, What Can Go Wrong, and Our Fit Guarantee

Custom blinds are cut to your numbers, and that is exactly what makes ordering blinds online feel risky. Nothing goes back on a shelf. If the width is wrong, there is no other window it happens to fit. So here is the whole thing, end to end: what happens after you click order, how long each part actually takes, the five things that genuinely go wrong, and what we do about each one. Including the limits, which are the parts worth knowing before you pay. Every figure below comes from Off Cut Shades' own published policies — [shipping](/help/shipping-policy), [guarantees](/help/return-policy) and [warranty](/help/warranty) — and is current as of September 2026. ## Ordering Blinds Online: The Whole Process in Six Steps **1. Configure the shade, then read the summary.** Our customizer walks you through it in order: Details first — width and length in inches, and your mount type. The size fields take whole numbers, decimals or fractions, so 48, 48.5 and 48 1/2 all work; enter what your tape says rather than rounding. Choose Inside Mount and we automatically deduct 1/8 inch from the width for clearance, so you give us the raw opening, not a guess at the finished size. After that comes Fabric, then, depending on the product, Bottom Bar, Control and Valance. The last step is a Summary screen that lists every choice back to you. Read it. It is the cheapest place in this whole process to catch a mistake. **2. Cart and checkout.** In the cart, every shade shows its size and mount type and can still be edited or removed. Checkout is two steps — shipping address, then payment. We take Visa, MasterCard and American Express through Stripe, plus PayPal, and Canadian customers may see Affirm financing as an option. The connection is encrypted and we do not store your full card details on our servers. **3. The confirmation email.** It lands with your order number, the full configuration, the price and the shipping address. This is your last easy checkpoint. Read the dimensions one more time, and if a number looks wrong, [contact us](/contact) straight away — production moves quickly, and the sooner you tell us, the more options there are. **4. Production in Toronto.** Your shade is made in our own facility in Toronto, and as of September 2026 orders are typically ready to ship within 2 business days. Business days exclude weekends and Canadian public holidays. That speed comes from cutting and assembly happening in one building we own, which is also why there is an inspection step at all. **5. Inspection and packing.** Every shade is inspected before it is boxed. If something is not right, this is where it is supposed to stop. **6. Delivery, then install.** Standard shipping is free across Canada, including remote locations, usually via Canada Post or Canpar, and you get tracking once the order ships. Then it is a DIY install — drill, screwdriver, pencil, tape measure, and the guide for your exact hardware on our [installation guides](/guides/installation-guide) page. Most people are done in well under an hour; our [roller shade install walkthrough](/blog/how-to-install-roller-shades) times it at about 15 minutes a window. Add it up. In Canada, as of September 2026: roughly 2 business days of production plus 3 to 9 business days of transit. To the USA, 5 to 10 business days of transit after production, with shipping calculated at checkout and any duties, taxes or brokerage fees the customer's responsibility. We ship to Canada and the USA only, and a larger order may arrive in more than one box. ## Step Zero: Samples, Before Any of That There is a step ahead of step one, and skipping it is the single most common way an online blind order goes sideways. Order [free fabric samples](/swatches). You can pick up to five, standard shipping in Canada is free, and sample orders leave us within 48 business hours. Standard sample delivery runs on the same 3 to 9 business day Canada Post estimate; if you are in a hurry, express is $15 plus tax by courier, roughly 1 to 3 business days, and it is fully refundable when you buy a shade. Here is the part we would rather you read now than discover later: **we cannot accept returns based on colour discrepancies if samples were not ordered.** Screens vary — brightness, colour profile, the daylight in your room, the lamp beside your desk. A photograph of a fabric is not the fabric. Tape the samples to the window frame, look at them at 9am and again at 7pm, and then decide. ## What Can Go Wrong (and Exactly What We Do) Five things. Each one has a named remedy, a deadline, and an honest note about what it costs you. ### You measured wrong **What we do:** the Fit Guarantee. Contact us within 30 days of delivery for one complimentary adjustment or remake per eligible shade, up to four shades per household. Replacements keep the original style, fabric, colour and operating system, and if the corrected size costs more, you pay only the price difference. **Your effort:** send your order number, a photo of your window and the measurements that need correcting. Do not trim or alter the shade yourself; modified products are not covered. **The limits, stated rather than buried:** it covers measuring mistakes on residential orders placed directly with us. It does not cover changes of style, colour or personal preference, installation errors, modified products, or wholesale and commercial orders. ### The colour is not what you pictured **What we do:** free samples, which is why they exist and why there are five of them. **Your effort:** order them before you order the shade. This is the one failure mode on the list where the remedy has to happen first — as above, colour is not covered once the shade is made if samples were never ordered. ### It arrives damaged **What we do:** replace or repair it. **Your effort:** inspect the package the day it arrives. If the box or the shade is damaged, email [email protected] within **7 days** of delivery with clear photos of both the damaged packaging and the damaged product. Claims reported after the 7-day window cannot be accepted, so open the box even if you are not installing for a fortnight. ### It is faulty, or not the size you ordered **What we do:** if your shade arrives damaged or does not match the dimensions you provided because of a manufacturing defect, we repair or replace it free of charge. Beyond that, our [5-year warranty](/help/warranty) covers manufacturing defects in materials and workmanship for five years from the date of purchase, for the original purchaser, in the window it was first installed in. **Your effort:** your order number, a description, and photos or video showing the defect. **The limits, stated rather than buried:** the warranty does not cover normal wear and fading, accidents, misuse or alterations, damage from excessive humidity or heat, problems caused by incorrect measurement or improper installation, motor battery charging and routine motor upkeep, or the shipping and labour costs of warranty service. ### You just do not love it **What we do:** the Satisfaction Guarantee. If you are not happy with the quality, style or overall look, tell us within 14 days of receiving the order and we will work with you on a solution. **Your effort:** tell us early, and tell us specifically what is wrong. ## The Fit Guarantee, Plainly Because every shade is cut for one window, traditional returns are not possible. That is the honest starting point. What replaces returns is three guarantees and one five-year warranty: - **[Fit Guarantee](/help/return-policy#fit-guarantee)** — 30 days from delivery, for your measuring mistakes. One complimentary adjustment or remake per eligible shade, up to four shades per household. - **Quality & Manufacturing Guarantee** — for our mistakes. Repair or replacement, free of charge. - **Satisfaction Guarantee** — 14 days from receipt, if the quality, style or look is not right. - **5-Year Warranty** — manufacturing defects in materials and workmanship, original purchaser, original window. All of them cover the original purchaser and the original installation, and none of them cover misuse, alterations, accidents or normal wear. Full terms are on our [guarantees page](/help/return-policy). If your situation is not obviously one of the four, [ask us](/contact) — that is a faster route than reading policy pages sideways. ## Why Ordering Blinds Online Beats an In-Home Appointment No one comes to your living room. There is no evening appointment, no measuring visit to schedule, no quote sitting on your counter. You measure the window with [the measuring guide](/blog/how-to-measure-windows-for-blinds) open, decide [inside or outside mount](/blog/inside-mount-vs-outside-mount-blinds), and we make the shade. What we will not do is publish a made-up comparison against an in-home quote we have never seen. A proper price breakdown deserves real numbers, and it gets its own article. And if the online part is the bit you distrust, the factory has a street address. Our showroom is at 50 Hollinger Road, Toronto, walk-ins welcome Monday to Friday, 8:30am to 5:00pm ET. [Come and look at the fabric in person](/showroom). ## Frequently Asked Questions **Is it safe to order custom blinds online?**\ Yes, with two conditions you control: order samples before committing to a colour, and measure with a metal tape and our [measuring guide](/guides/measuring-guide) open. Payment runs through Stripe or PayPal over an encrypted connection and we do not store your full card details. Everything after that is covered above — 30 days on fit, 14 days on satisfaction, 7 days on shipping damage, five years on manufacturing defects. **What happens if I measure my windows wrong?**\ Contact us within 30 days of delivery and the Fit Guarantee applies: one complimentary adjustment or remake per eligible shade, up to four shades per household. Do not wait past 30 days, and do not cut the shade down yourself — modified products are not covered. **How long do custom blinds take to arrive in Canada?**\ As of September 2026, about 2 business days of production in our Toronto factory, then 3 to 9 business days of standard shipping, which is free anywhere in Canada. To the USA it is 5 to 10 business days after production, with shipping calculated at checkout. Business days exclude weekends and Canadian public holidays. **Can I return custom blinds?**\ Not in the ordinary sense — a shade cut to your window cannot be resold, so traditional returns are not possible. Instead you have 30 days from delivery for a fit issue, 14 days from receipt for a satisfaction issue, 7 days for shipping damage, free repair or replacement for a manufacturing defect, and a 5-year warranty. Details on our [guarantees page](/help/return-policy). **Do online blinds match the colour on screen?**\ Not reliably, and we will not pretend otherwise. Screens differ and so does the light in your room. Order up to five [free samples](/swatches) and check them in your own window — and note that we cannot accept returns based on colour discrepancies if samples were not ordered. The samples are free, the shipping is free, and the only cost is a few days. ## The Short Version Order samples. Measure twice. Read the summary screen and the confirmation email. Then it is roughly 2 business days in the factory and 3 to 9 in transit, and if something goes wrong there is a named guarantee with a deadline attached to it rather than a phone tree. [Order your free samples first](/swatches) — that is the step that removes the most risk for the least effort. Ready to see a number for your window, [get a price in about 60 seconds](/quiz). Ready to build the shade, [shop custom blinds](/shop) made in Toronto. Anything still unclear is either in our [FAQ](/help/faq) or one [message](/contact) away.

Buying GuideHow-To
Read Article
How to Install Zebra Blinds: Brackets, Levelling and Common Mistakes
8 min read

How to Install Zebra Blinds: Brackets, Levelling and Common Mistakes

You unroll a zebra shade on the floor, look at the stripes, and start worrying about whether they will line up on the window. Almost everyone does. It is the fear that follows this product around. Here is how to install zebra blinds, in one sentence: it is a roller shade install with two extra rules — get the brackets genuinely level, and learn where to stop the shade. Band alignment is not luck and it is not fragile. It is geometry. Every spec below comes from Off Cut Shades' own factory installation sheets — downloadable for your exact hardware on our [installation guides](/guides/installation-guide) page — and is current as of August 2026. ## Zebra vs. Roller Install: What's Different Very little, which is the reassuring part. A [zebra shade](/shop/info/zebra) — the industry calls it a banded shade — alternates sheer and solid bands on one roller: line them up and light filters through the sheer sections, overlap them and the solid bands close off the view. It hangs off the same hardware as a roller shade, and our factory install sheets are the same sheets. If you have read [how to install roller shades](/blog/how-to-install-roller-shades), you know most of this. Three things genuinely differ. **It always arrives in a cassette.** Our zebra shades come with a Curved Cassette, a Compact Curved Cassette or a Square Cassette — there is no open-roll zebra. So the install is always the cassette version: brackets first, cassette snaps onto them. **The bottom bar has a job.** The aluminum bar on a banded shade is not just a weight. It is designed specifically for banded shades, it holds the two fabric layers together, and it maintains their alignment, with an internal roller that lets the banded fabric glide through it. Part of the mechanism, not a handle. **Level is visible.** On a plain roller shade an unlevel install shows up as a small wedge of daylight. On a zebra it shows up as a dozen tilted horizontal lines. Same error, much louder. ## How to Install Zebra Blinds: Step by Step Tools are the standard set from our installation guides page — tape measure, pencil, drill, screwdriver, level, ladder. The level is listed there as "recommended"; on a zebra, treat it as mandatory. **Before you drill, three checks.** Our sheets put two ahead of everything: every part on the component list is in the box, and the shade's dimensions match your order and your window. The third is specific to this product — check the chain or motor is on the side you ordered. Control position is chosen at order time in our customizer, not adjusted on the wall, so if it is wrong, stop and [contact us](/contact) before any holes exist. **1. Work out your bracket count.** Our cassette install sheets set this by shade width, and as of August 2026 the counts are: under 60 inches, two brackets; 60 to 96 inches, three; 96 to 120 inches, four; 120 to 148 inches, five; over 148 inches, six. Space them evenly, and keep the outer brackets no more than 2 inches in from the ends of the cassette. **2. Mark the first bracket, with clearance.** Our sheets ask for about a quarter inch between the bracket and the ceiling on a wall mount, or between the bracket and the wall on a ceiling mount — the gap that lets you take the shade down again years from now. **3. Draw the level line.** Carry that first mark across to every other bracket position with the level. Our sheets are explicit that the brackets must be installed level and aligned to each other, and that shimming may be required. Frames are often out of square, so a thin shim behind the low bracket is the correct fix, not a compromise. This step decides whether your bands look straight. **4. Pilot, screw, re-check.** Pilot holes stop the screws wandering off your line. Drive the brackets in, then put the level back across them before the shade comes near. **5. Snap the cassette in.** With the front face toward you, insert the cassette's back edge onto the bottom of each bracket. Then, starting from the centre, push it back and up until it snaps into the bracket's top tab — an audible click at every one. Centre first, outward second; starting at an end is what makes the other end refuse. **6. If it has a chain, fit the safety shield.** Not optional. The loop holder and joint piece must be screwed to a wall or window frame: pull the loop holder taut, screw it in, then check the chain shroud is raised before fitting the joint piece with its own screw. Our sheets carry the standard warning because it is real — young children can be strangled by cords, and any cord longer than 22 cm, or a loop more than 44 cm around, must not be left accessible. If that worries you, zebra shades are also available chainless with a Glide Bar, or motorized. **7. Run it, then set where it stops** — the part everyone came for. ## The Band Alignment Rules A zebra shade is one piece of fabric with alternating bands, wrapped around one tube. The band edges run parallel to that tube. So if the tube is level, every band edge is level. If the tube runs slightly downhill, so does every band edge — and stacked up the window, you see it instantly. That is the whole thing. Bands do not go crooked on their own — they are a very sensitive spirit level, reporting on your brackets. **What the factory already handled.** The front-to-back relationship between the two fabric layers is not your job. The shade is assembled here in Toronto, and the banded bottom bar is built to hold the two layers together and keep them aligned. You cannot knock that out by installing carefully. **What you set is where it stops.** Light control comes from stopping the shade so the solid bands sit either over the sheer ones (closed) or between them (open). How depends on your control: - **Chain or Glide Bar.** No bottom limit stop to program, and our install sheets do not specify one. You stop the shade where you want it, as with any chain shade. Fussy on day one, automatic inside a week. - **Motorized.** Here you do set limits, and immediately — our rechargeable motors ship in factory default mode with no limits set, and the programming sheet says to set them right away to protect the shade. Upper and lower cannot sit at the same point, and once set they survive a power-off. Put the lower limit at your fully-closed band position and the motor lands there every time. Full steps are in the motorized PDF on our [installation guides](/guides/installation-guide) page, and the systems themselves are covered under [motorized solutions](/motorized-solutions). ## Common Mistakes **Unlevel brackets.** Behind essentially every "my zebra bands are crooked" message we get. The fix is the prevention: level line, shim the low side, re-check before the cassette goes on. **Forcing the cassette.** If it will not click, something is not seated — usually the back edge has missed the bottom of one bracket, or you started from an end. Back it off and go again from the middle. Our [5-year warranty](/help/warranty) covers manufacturing defects but excludes problems caused by improper installation, so be patient here. **Drilling before checking the control side.** A chain on the wrong side is an order issue, not an install issue — much cheaper to catch with the drill still in the box. **Expecting a stop that does not exist.** On chain and Glide Bar shades there is nothing to program. If the bands are not landing where you want, the answer is where you stop the shade — or, if the lines look tilted, the brackets. ## Care Handoff: The First Week Run the shade fully up and down a few times over the first few days, and always operate it from the centre of the bottom bar — off-centre pulling is what makes fabric telescope to one side. After a week, put the level back on the cassette: if a screw has settled in soft drywall, you want to know while it is a two-minute fix. Cleaning gets its own guide shortly — the bands are two different materials and do not want the same treatment. Until it lands, [ask us](/contact) about your fabric. If the shade does not fit the window, that is the Fit Guarantee rather than an install problem: contact us within 30 days of delivery for one complimentary adjustment or remake per eligible shade, up to four shades per household. Details on our [Fit Guarantee page](/help/return-policy#fit-guarantee). Not ordered yet — [measure first](/blog/how-to-measure-windows-for-blinds), then decide [inside or outside mount](/blog/inside-mount-vs-outside-mount-blinds). ## Frequently Asked Questions **Are zebra blinds hard to install?**\ No harder than a roller shade. Mark a level line, drive the screws, click the cassette on. The only extra care a zebra needs is on the levelling. **Why are my zebra blind bands crooked?**\ Almost always because the brackets are not level with each other. The band edges run parallel to the roller tube, so a tube sitting slightly downhill puts every band on the same angle. Level the brackets, shim the low one, re-hang. **How do zebra blind brackets work?**\ They screw to the wall, ceiling or frame first, and the cassette snaps onto them: back edge onto the bottom of each bracket, then push back and up from the centre until it clicks. Count goes by width — two under 60 inches, up to six above 148 — with the outer pair within 2 inches of the cassette ends. **Which side should the zebra blind chain be on?**\ Whichever side you chose when you ordered — control position is a left-or-right choice made in the customizer, so check the shade matches your order before you drill. Most people put it away from furniture and out of a child's reach. **How do you set the bottom limit on zebra blinds?**\ Only motorized shades have limits, and our motors arrive with none programmed — set upper and lower straight away, the lower one at your fully-closed band position. Chain and Glide Bar zebra shades have no limit stop; you stop where the bands sit how you want them. ## Level Brackets, Aligned Stripes Level brackets, click the cassette, set the stop — and the stripes behave. [Shop zebra shades](/shop/info/zebra) cut and aligned in our Toronto factory. Still choosing fabric — [order free samples](/swatches) and see how the vanes behave in your own light. Ready to price a window — [get a price in about 60 seconds](/quiz).

How-ToInstalling
Read Article
How to Install Roller Shades in 15 Minutes: A Step-by-Step Guide
8 min read

How to Install Roller Shades in 15 Minutes: A Step-by-Step Guide

Your shades have arrived, the box is on the floor, and somewhere inside it are two small brackets that look far too small to hold anything. This is the part people quietly dread. It is also, genuinely, the easy part. Here is how to install [roller shades](/shop/info/roller) in about fifteen minutes a window: mark a level line, drive four screws, click the shade in. Two brackets, one drill, one level. If you have ever hung a picture frame straight, you already have the only skill that matters. The rest is detail — the real tool list, the steps for both mounts, the four mistakes that cause crooked rolls, and what to do when something looks wrong. Every spec below comes from Off Cut Shades' own factory installation sheets, downloadable for your exact hardware from our [installation guides](/guides/installation-guide), and is current as of August 2026. ## Tools and Time: The Honest List Our installation guides page lists what you need, and it is short: - A metal tape measure - A pencil - A drill with the right bits for your wall - A Phillips screwdriver - A level — the page calls this "recommended", but treat it as required - A step ladder, if the window is high That is the whole kit. No specialist tools, no second person. About the fifteen minutes: it is a fair number for a standard-width shade going into a wooden frame on two brackets. It is not a fair number for your first window ever — add ten while you get the feel of it — or for a very wide shade that needs five brackets, or for anything going into concrete. Do the first one slowly. The rest genuinely go fast. Before the drill comes out, do the two things our install sheets put ahead of everything else: check that every part listed on the sheet is in the box, and check that the shade's dimensions match your order and your window. ## How to Install Roller Shades: Inside Mount Inside mount sits the shade inside the recess — the neater look, and the one most people want. It needs roughly 2 inches of flat depth inside the frame, more with a cassette or valance. The [measuring guide](/guides/measuring-guide) has the depth rules; if you have not ordered yet, read [inside mount vs. outside mount](/blog/inside-mount-vs-outside-mount-blinds) first. **1. Work out how many brackets you need.** Our cassette installation sheets set this by shade width, and as of August 2026 the counts are: under 60 inches, two brackets; 60 to 96 inches, three; 96 to 120 inches, four; 120 to 148 inches, five; over 148 inches, six. Space them evenly across the width, and keep the two outer brackets no more than 2 inches in from the ends of the cassette. **2. Find the clutch end.** Hold the shade up and note which side the chain or motor sits on. On our open-roll system the brackets are universal — either one accepts the clutch or the pin — but the shade still only goes in one way round. On older hardware where the two brackets are different parts, a clutch on the left means you reverse the bracket positions, left for right. **3. Mark the first bracket.** Hold it inside the recess, tight to the top and to the side, and pencil through the screw holes. **4. Draw the level line.** Carry that first mark across to the other bracket positions with the level. This is the one rule the whole job rests on. Our sheets require the brackets to be level and aligned with each other, and note that shimming may be required — so if the frame is out of square, which frames often are, a thin shim behind one bracket is the correct fix, not a bodge. **5. Drill pilot holes.** A small pilot at each mark keeps the screw from wandering off your line and a wooden frame from splitting. The step people skip and then regret. **6. Screw the brackets in and re-check level** before you touch the shade. Two screws are far easier to move now than later. **7. Click the shade in.** With a cassette, front face toward you, hook its back edge onto the bottom of each bracket, then start at the centre and push back and up until it snaps in. You should hear an audible click at every bracket. With an open roll, put the spring-loaded pin end in first, keep gentle pressure on it, then lift the clutch end and drop its two hooks into the two slots in the bracket, pulling down gently to seat it. The bottom of the clutch should point straight down. **8. Test the roll.** All the way down and up, twice. Operate from the centre of the bottom bar — off-centre pulling is what makes fabric telescope to one side, and on Zero Gravity spring shades it matters even more. **9. If it has a chain, fit the safety shield.** Not optional. The loop holder and joint piece screw into the wall or window frame and keep the chain taut. Our sheets carry the standard warning for a reason: young children can be strangled by cords, and any cord longer than 22 cm or a loop more than 44 cm around must not be left accessible. ## Outside Mount: Wall and Ceiling Outside mount puts the shade on the wall above the opening, overlapping it by 1.5 to 3 inches per side. It is the fix for shallow recesses, out-of-square openings and light gaps, and needs a flat surface above the frame to land on. The steps are the same with two additions. First, decide your top line before you mark anything — how high above the frame the shade sits determines the finished look, so hold it up, pick the height, mark one end and carry it across with the level. Second, leave breathing room: for a wall mount our sheets ask for about a quarter inch between the ceiling and the bracket, and for a ceiling mount about a quarter inch between the wall and the bracket. That gap is what lets you take the shade down again in five years without fighting it. On what to screw into: get into wood wherever you can — the frame or the molding — because it holds better than anything you can add to drywall. If there is only drywall behind the bracket, use a wall anchor rated to carry it. Our sheets deliberately do not name a hardware type, because the right anchor depends on your wall, so if you are unsure what is behind yours, [ask us](/contact) before drilling rather than after. And if you live in a condo with concrete lintels, be realistic: that is a masonry bit, plugs, more dust and more patience. Very doable, but not the fifteen-minute version. ## The Four Mistakes That Cause Problems **Brackets that are not level.** The cause of almost every crooked roll. The fabric tracks toward the low side and creeps further over with each cycle until one edge rides up the tube. The fix is the prevention: level the brackets and shim the low one. **The wrong number of brackets, or uneven spacing.** On a wide shade, too few brackets lets the cassette sag in the middle, and the roll follows the sag. Count off the widths above and keep the outer pair within 2 inches of the ends. **Skipping pilot holes.** A screw driven straight into hard wood wanders, and a bracket two millimetres off your mark is a bracket that is no longer level. Ten seconds a hole. **Forcing the mechanism.** If the shade does not click in, something is not lined up — usually the pin end is not fully seated, or the clutch is not sitting straight down. Back it out and re-seat it. Our [5-year warranty](/help/warranty) covers manufacturing defects but specifically excludes problems caused by improper installation, so the two minutes you spend not forcing it are well spent. ## Renter Notes The honest version: yes, this puts holes in your window frame. Four small screw holes for a standard shade — the same holes a curtain rod bracket leaves. Filler, a fingertip and five minutes fixes them on the way out. What we will not do is guess about your lease. If drilling is not allowed where you live, [talk to us](/contact) before you order rather than after. ## If Something's Wrong **The shade rolls crooked.** Check the brackets with a level before anything else. **The shade does not fit the window.** If you mis-measured, our Fit Guarantee is the safety net: contact us within 30 days of delivery for one complimentary adjustment or remake per eligible shade, up to four shades per household. Details on our [Fit Guarantee page](/help/return-policy#fit-guarantee). **Something looks or feels faulty.** That is a [warranty](/help/warranty) question, not an install question. **You cannot tell which hardware you have.** Match the picture on the [installation guides](/guides/installation-guide) page — open roll, square cassette, curved cassette or motorized — and download that PDF. It is the exact sheet the factory packs. ## Frequently Asked Questions **What tools do I need to install roller shades?**\ A metal tape measure, a pencil, a drill with the right bits, a Phillips screwdriver, a level and a step ladder if the window is high. That is the full list from our installation guides page — nothing specialist on it. **How far apart should roller shade brackets be?**\ Evenly across the width, with the outer brackets no more than 2 inches from the ends of the cassette. The count goes by width: two under 60 inches, three from 60 to 96, four from 96 to 120, five from 120 to 148, six above that (as of August 2026). **Do roller shades need drilling?**\ Yes. The brackets screw into the window frame, the wall or the ceiling — four small screws for a standard shade, and the holes patch easily. **Can one person install roller shades?**\ For a normal window, comfortably. A very wide or heavy shade is easier with someone holding one end, but the marking and drilling is a one-person job either way. **Why does my roller shade roll crooked?**\ Nine times out of ten the brackets are not level, so the tube runs slightly downhill and the fabric drifts. Level them and shim the low side. If it simply rolls the opposite way to what you expected, that is roll direction rather than a fault — see [reverse roll shades](/blog/ordering-reverse-roll-shades). ## Fifteen Minutes, Two Brackets, Done Mark the line, keep it level, pilot the holes, click it in. That is the entire job, and the only part that rewards care is the level line. If you can hang a picture frame straight, you can install these. [**Shop roller shades**](/shop/info/roller) and see for yourself — or [order free samples](/swatches) if you are still choosing fabric, [measure first](/blog/how-to-measure-windows-for-blinds) if you have not, and [get a price in about 60 seconds](/quiz) when you are ready.

How-ToInstalling
Read Article
Inside Mount vs. Outside Mount Blinds: Which Looks Better (and When You Have No Choice)
8 min read

Inside Mount vs. Outside Mount Blinds: Which Looks Better (and When You Have No Choice)

Every custom blind order starts at the same fork in the road: inside mount vs outside mount blinds. Get it right and everything after it is easy. Get it wrong and you spend the next five years looking at either a light leak you can't unsee or a beautiful window casing you've completely covered up. Most of the time you get to choose, and the choice is about looks. Some of the time your window quietly makes the decision for you — a shallow frame, a crank handle, a tile return — and the trick is knowing which of those two situations you're in. That takes about thirty seconds. Below is a verdict for every common case. Not "it depends" — an actual answer, plus what we'd do if it were our window. ## Inside Mount vs Outside Mount Blinds: The 30-Second Answer **Choose inside mount** if your window frame has enough flat depth for the brackets and you like a clean, recessed, built-in look. The shade sits inside the opening, your trim stays visible, and nothing goes into your wall. **Choose outside mount** if you want maximum darkness, if your frame is shallow, if the window is out of square, or if the frame itself is something you'd rather hide. The shade mounts on the wall or trim above the opening and covers everything behind it. **If you're genuinely torn:** default to inside mount everywhere except the bedroom. Inside looks better in most rooms, and the bedroom is the one place where the last few percent of darkness is worth more than the tailored look. That's the rule of thumb. The rest of this page is the fine print worth knowing before you order. [**Shop Now**](/shop) ## Inside Mount: The Built-In Look An inside-mount shade drops into the window recess, so the frame stays on show and the whole thing reads as part of the architecture rather than something added later. If you have decent trim — a deep sill, a chunky casing, anything you'd point out to a visitor — inside mount is how you keep it. The other quiet advantage is that nothing gets drilled into your wall. The brackets go into the window frame itself, which means smaller holes in a less precious surface. ### How much depth do you actually need? Enough flat depth inside the frame for the brackets to sit properly. Our [measuring guide](/guides/measuring-guide#mount-type) puts the screening number at a minimum of about 2 inches (roughly 50 mm), and that's the figure to use as of August 2026 when you're standing at the window with a tape measure deciding whether inside mount is even on the table. Treat 2 inches as the screening test, not the final answer. Depth requirements differ between systems, and a cassette or valance needs more room than a bare roller — so check the depth requirement on the specific product page for the shade you're actually ordering. If your frame comes up short, that's not a problem to solve, it's just a decision made for you: outside mount. ### The light gaps, honestly Inside mounts have light gaps. Every inside mount, every brand, ours included. The shade has to be slightly narrower than the opening or it would jam, so we take a small clearance deduction — about 1/8" — off your width before we cut. That clearance shows up as a thin bright line down each side when the sun is directly behind the shade. In a living room or a kitchen you'll never think about it. In a bedroom at 6am in June, you will. This single fact is why the bedroom verdict below goes the way it does. ### The other trade-off Inside mount is the less forgiving measurement. You're fitting a made-to-measure panel into a fixed opening, so out-of-square frames and bowed sills show up. Our factory handles the deductions — you send the exact opening and we do the math — but the opening still has to be square enough to accept a rectangle. Full method in [how to measure for each mount](/blog/how-to-measure-windows-for-blinds). ## Outside Mount: The Coverage Play An outside-mount shade hangs on the wall or trim above the window and overlaps the opening on every side. It is the more forgiving of the two mounts in almost every way, and it is the one people underrate. It kills the side light gaps, because there's no recess for light to sneak around. It makes a small window look bigger, because you control where the top and the edges land. It forgives an out-of-square opening entirely, because the shade never has to fit into anything. And it covers a tired or mismatched frame completely. ### How much overlap We recommend at least **1.5 to 3 inches of overlap per side** — 3 to 6 inches wider than the opening in total — for proper light control and privacy (measuring guide, as of August 2026). For height, you need roughly 2 inches of flat surface above the frame for the brackets, and then you measure down to wherever you want the bottom of the shade to sit. Mount higher than you think: taking the shade up towards the ceiling is the cheapest way to make a window look taller than it is. On an outside mount there are no deductions at all. You give us the finished size you want to see on the wall and we build exactly that. ### What you give up Trim. If the casing is the nicest thing about the window, an outside mount hides it. You also need anchors in the wall or ceiling rather than the frame, which is a bigger commitment — worth a look at the [installation guide](/guides/installation-guide) before you order if you're doing it yourself. ## When You Have No Choice Some windows decide for you. If any of these describe yours, stop weighing looks and take the verdict. - **Shallow frames, or no usable frame at all.** Can't hit the depth for brackets? Outside mount. There's no workaround worth attempting here. - **Cranks and handles in the way.** Casement windows with a crank sticking into the opening are the classic case. **Outside mount** — or, if you have depth to spare and want to stay inside, a [reverse roll](/blog/ordering-reverse-roll-shades) hangs the fabric off the back of the roller so it clears the obstruction. - **Tile, stone or quartz returns.** Uneven or stepped sills make an inside fit fussy. **Outside mount** is more forgiving and looks more deliberate. - **Older, out-of-square openings.** If the width at the top and bottom disagree by more than a hair, **outside mount** and stop measuring three times. - **Blackout is the whole point.** **Outside mount.** An inside mount with a blackout fabric still has clearance gaps at the sides; the fabric goes dark, the edges don't. - **Patio and French doors.** Handles protrude, and the shade needs to clear them. **Outside mount**, mounted high and wide. ## Room-by-Room Verdicts **Bedrooms — outside mount.** Sleep beats styling. The overlap is what actually removes the side light, and it's the difference between a dark room and a dim one. **Living rooms — inside mount if the depth allows.** This is where the built-in look pays off, and where a bright edge at the sides costs you nothing. If you're doing a whole wall of windows, inside mount keeps the rhythm of the frames visible. **Kitchens and bathrooms — inside mount.** Keeping the shade inside the recess pulls it back from splashes, taps and the edge of the counter, and it's easier to wipe around. The exception is a window right behind a sink where the sill collects water — go outside and mount high. **Rentals — inside mount, usually.** The brackets go into the window frame rather than your wall, which is the smaller hole in the less contentious surface. Check your lease before you drill either way, and take the shade with you when you go: it's yours. **Home offices and media rooms — outside mount.** Same logic as bedrooms, but the enemy is screen glare rather than sunrise. Check your depth, then take the numbers with [how to measure for each mount](/blog/how-to-measure-windows-for-blinds). ## Frequently Asked Questions **Is inside or outside mount better for blinds?**\ Inside mount looks better in most rooms — it shows off your trim and reads as built in. Outside mount performs better: more darkness, no side gaps, and it forgives windows that aren't square. Inside for looks, outside for coverage. **How much depth do inside mount blinds need?**\ Plan on a minimum of about 2 inches (roughly 50 mm) of flat depth inside the frame for the brackets, and more if you've chosen a cassette or valance. Check the depth requirement on the product page for the specific shade before ordering — the screening number gets you to the shortlist, the product page gives you the answer. **Do outside mount blinds block more light?**\ Yes. An inside-mount shade has to be slightly narrower than the opening to clear it, so a thin gap runs down each side. An outside mount overlaps the opening by 1.5 to 3 inches per side, so there's no gap to leak through. **Can you mount blinds on the ceiling?**\ On the right system, yes. Our compact square cassette uses snap-on brackets designed for wall or ceiling mounting, and the Snug universal bracket installs in either application. Ceiling mounting is a good move for floor-to-ceiling glass or when there's no usable wall above the frame. **Should bedroom blinds be outside mount?**\ If darkness matters, yes. Blackout fabric on an inside mount still leaves the clearance gaps at the sides, and those edges are what wake you up. Outside mount with generous overlap is the version that actually blacks out. ## Pick Your Mount, Then Measure Once Inside if you have the depth and you love the trim. Outside if you want the room dark, the window bigger, or the frame gone. When your window has a shallow recess, a crank, a stone sill or a stubborn out-of-square opening, it has already chosen for you — and outside mount is a genuinely good outcome, not a consolation prize. Pick your mount, grab the [measuring guide](/guides/measuring-guide), and your windows are 60 seconds from a price. [**Shop Now**](/shop) — or [order free samples](/swatches) first if you want to see the fabric in your own light, and [get a price in about 60 seconds](/quiz) when you're ready.

How-ToMeasuring
Read Article
How to Measure Windows for Blinds: The Foolproof Guide (Inside & Outside Mount)
8 min read

How to Measure Windows for Blinds: The Foolproof Guide (Inside & Outside Mount)

Learning how to measure windows for blinds is the one step that decides whether your custom order fits perfectly or arrives the wrong size — and it makes people nervous, understandably. You are about to spend real money on made-to-measure blinds, and it feels like a single bad number ruins everything. Here is the good news, and the single most important thing on this page: **you measure the opening, we do the math.** You give Off Cut Shades the exact size of your window, and our Toronto factory applies the correct deductions before we cut a thing. There is no formula for you to get wrong. And if something still slips through, our [Fit Guarantee](/help/return-policy#fit-guarantee) has your back — more on that below. Follow the steps here and you really can't mess this up. The method is identical for every custom blind and shade we make — so once you know how to measure for [roller blinds](/shop/info/roller), you can measure for [zebra shades](/shop/info/zebra), sheers, or roller shades with exactly the same confidence. Grab a metal tape measure and let's go. ## Before You Measure: 3 Rules Read these first. They prevent almost every measuring mistake we see. 1. **Use a steel tape measure — never a fabric one.** Cloth and vinyl tapes stretch and sag, and a stretched tape means a wrong number. A rigid metal tape is the only tool you need — ideally one marked in both inches and millimetres so you can read a precise number. 2. **Measure every window, even identical-looking ones.** Two windows that look the same are often 1/4" (about 6 mm) apart. Openings settle and shift over the years, so measure each one on its own and label it. 3. **Always write it down as width × height, in that order.** Width first, height second — every time. This is how you'll enter it when ordering, and mixing up the two is the easiest error to avoid. > **The millimetre-vs-inch rule:** measure as precisely as your tape allows — reading down to the millimetre is fine, and often more accurate than eyeballing an inch fraction. Just note that Off Cut Shades' order form is entered in **inches, rounded down to the nearest 1/8"** (and 1/8" ≈ 3 mm). So take a precise reading, then round *down* to the nearest 1/8" when you enter it — or tell us your millimetre figure and we'll convert it for you. ## Do You Measure the Glass, the Frame, or the Opening? This trips up almost every first-timer, so let's settle it up front: you measure the **opening — never the glass.** The pane of glass is smaller than the space your blind actually has to cover, so measuring it all but guarantees a blind that's too narrow and too short. For an **inside mount**, the opening is the *inside of the window frame* — the recess the blind drops into. Put your tape against one inside edge of the frame and read across to the opposite inside edge. For an **outside mount**, the "opening" is really the stretch of wall or trim you want the blind to cover, plus your overlap. Either way you're measuring the air gap across the recess (or the wall), not the glass and not the lip of the sill. ## Inside Mount vs Outside Mount Before you touch the tape, decide where the blind will sit, because it changes how you measure. - **Inside mount** — the blind sits *inside* the window frame for a clean, built-in look. You measure the exact opening. - **Outside mount** — the blind mounts on the wall or trim *above and around* the opening. You measure the finished size you want the blind to be. Not sure which one? See the section *Which Mount Should You Pick?* further down, or view the mounts side by side in our [inside vs outside mount comparison](/guides/measuring-guide#mount-type). ## Inside Mount: Step by Step ![How to measure a window for an inside-mount blind — width at top, middle and bottom; height at left, centre and right.](/images/guide/measure_inside_detailed.jpg) Every inside mount measurement rests on one promise: you give us the **exact opening size** and we do the rest. Do not subtract anything — we make the clearance deduction (about 1/8") for you. ### Width 1. Measure the inside width of the frame in three places: **top, middle, and bottom.** 2. Windows are rarely perfectly square, so these numbers may differ. 3. Record the **narrowest** of the three. Round down to the nearest 1/8 inch. That narrowest width is the number you order. Taking the narrowest guarantees the blind clears the opening at its tightest point. ### Height 1. Measure the height from the top inside edge of the frame down to the sill in three places: **left, centre, and right.** 2. Record the **shortest** of the three. Round down to the nearest 1/8 inch. Taking the shortest height is the number you enter, so the blind clears the sill everywhere without catching. The rule to memorise: **narrowest width, shortest height.** ### Depth check Inside-mount blinds need enough flat depth inside the frame for the brackets — usually a **minimum of about 2 inches (roughly 50 mm)**, and more if you've chosen a cassette or valance. Check the depth requirement on the specific product page before you order. If your frame is too shallow, switch to an outside mount. ## Outside Mount: Step by Step ![How to measure a window for an outside-mount blind — measure the full finished size you want the blind to cover.](/images/guide/measure_outside_detailed.jpg) For an outside mount there are no deductions at all. **We build the blind to the exact width and height you give us**, so you measure the finished size you want to see on the wall. 1. **Add overlap for the width.** For good light control and privacy, add at least **1.5 to 3 inches on each side** of the opening (about 40–75 mm per side; 3–6 inches wider in total). Measure the full width you want the blind to cover, overlap included — that's your order width. 2. **Choose your top mounting point for the height.** Make sure there's enough flat surface above the frame (about 2 inches) for the brackets. Measure from that point down to where you want the bottom of the blind to sit — the sill, or slightly below for fuller coverage. 3. **Account for handles and trim.** If there's a crank, a protruding handle, or decorative trim, mount high enough and wide enough that the blind clears it and covers it cleanly. > **Download the printable checklist.** Jot down each window's numbers as you measure — it's a free, no-signup PDF in our [window measuring guide](/guides/measuring-guide). ## Which Mount Should You Pick? Here's the quick version — pick whichever list sounds like your window. ### Choose inside mount if… - Your frame is at least ~2" (about 50 mm) deep. - You want a clean, recessed, built-in look. - You're happy with tiny light gaps at the very edges. ### Choose outside mount if… - Your frame is shallow, or there's no usable depth. - You want maximum light blockage and privacy. - You want to make a small window look larger, or hide an out-of-square or worn frame. Roller shades, zebra blinds, and sheers all take either mount the same way, so this one choice applies no matter which style you're ordering. Still torn? The full walk-through lives in our [measuring guide](/guides/measuring-guide). ## Special Situations A few windows need a small tweak — one fix each: - **Tile or quartz sills:** measure to the point where the blind will actually rest; if the sill is uneven, an outside mount is more forgiving. - **Cranks and handles (casement windows):** if the handle sticks out into the opening, choose an outside mount, or check that the blind's projection clears the handle. - **Doors (patio/French):** account for the handle and add extra height so the blind clears it; outside mount is usually best. - **Shallow frames:** if you can't hit the minimum depth, go outside mount. - **Out-of-square openings:** trust the rule — narrowest width, shortest height — and let the deductions do the rest. ## Common Measuring Mistakes to Avoid Almost every wrong-size order traces back to one of these — and each is easy to dodge once you know it: - **Reusing one measurement across several windows.** Even a row of identical-looking windows can vary by 1/4". Measure and label every opening. - **Deducting the clearance yourself.** On an inside mount, send the exact opening — subtracting the 1/8" as well leaves the blind too narrow. We handle that. - **Measuring the glass instead of the opening.** Always measure the frame recess (inside mount) or the area you want covered (outside mount). - **Using a cloth tape.** It stretches, so the number drifts a few millimetres every time. Steel only. - **Guessing the depth.** Confirm the frame is deep enough for an inside mount before you order — otherwise switch to an outside mount. ## What Happens to Your Numbers at the Factory Here's the trust part, and why measuring is safer than it feels. - **We apply the deductions.** For an inside mount, you send the exact opening and we shave the small clearance (about 1/8") so the blind drops in smoothly. For an outside mount, we build to your numbers exactly. Either way, there is no math for you to do. - **We flag suspicious dimensions.** Because every blind is cut here in Toronto rather than drop-shipped, our team eyeballs orders with unusual proportions and will reach out if a measurement looks off before anything is cut. - **The Fit Guarantee.** If you accidentally mis-measure, contact us within **30 days** of delivery for one complimentary adjustment or remake per eligible shade, up to four shades per household. Read exactly [what happens if your blinds don't fit](/help/return-policy#fit-guarantee). That's the whole point: you handle the tape, we handle the risk. [**Shop Now**](/shop) ## How to Measure Windows for Blinds: Your Printable Checklist Run through this before you order. Want it on paper? Download the free printable worksheet from our [window measuring guide](/guides/measuring-guide) and fill in one line per window. ☐ Used a **steel** tape measure ☐ Measured **each** window separately and labelled it ☐ Decided inside or outside mount ☐ **Inside:** recorded **narrowest** width, **shortest** height (exact opening — no deductions) ☐ **Outside:** recorded finished width with 1.5–3" overlap per side, plus finished height ☐ Checked frame depth (inside mount) ☐ Wrote everything as **width × height**, rounded down to the nearest 1/8" ## Frequently Asked Questions **Do I measure the window or the blind size?**\ For an inside mount, measure the window opening and we make the deductions. For an outside mount, measure the finished blind size you want, including overlap. **Should blinds be wider than the window?**\ Only for outside mount — add 1.5 to 3 inches per side for privacy and light control. Inside-mount blinds sit within the opening at the size you provide. **What is the narrowest width rule?**\ For inside mounts, measure the width at the top, middle, and bottom and order the smallest of the three, so the blind clears the frame at its tightest point. **Do you deduct for inside-mount blinds?**\ Yes. Send us the exact opening width and we take off the small clearance (about 1/8") ourselves. Please don't subtract it yourself, or the blind will end up too small. **What if I measured my windows wrong?**\ Contact us within 30 days of delivery. Our [Fit Guarantee](/help/return-policy#fit-guarantee) covers one complimentary adjustment or remake per eligible shade, up to four shades per household. **Are millimetres or inches better for measuring blinds?**\ Either works for *measuring* — millimetres can even be more precise, so read whichever scale on your tape is clearer. For *ordering*, Off Cut Shades' form uses inches rounded down to the nearest 1/8" (1/8" ≈ 3 mm), so take your precise reading and round it down when you enter it. That rounding is not a deduction — you never subtract for clearance yourself; we handle all deductions. Measured in millimetres? Just send us the number and we'll convert it. ## You Measure the Opening — We Do the Rest You measure the opening; we do the math, the cutting, and the guarantee. Grab your tape, run through the checklist, and get a price in about 60 seconds. Ready when you are — [shop custom blinds](/shop), or [order free samples first](/swatches) if you'd like to see the fabric in your own light before you commit.

How-ToMeasuring
Read Article
Using Graphic Shades for Impact: Transform Your Space
5 min read

Using Graphic Shades for Impact: Transform Your Space

If you want to go a step further than traditional shades and fabrics and give your space a visual impact, graphic shades are exactly what you're looking for. These innovative window coverings feature bold designs and patterns that can give your interior an expressive boost, whether at home, at work, or in the office.   This blog will shine the light on different ways you can use graphic shades to create stunning effects in different settings, focusing on both practical and artistic benefits.   ## Understanding Graphic Shades Graphic shades are a unique category of window coverings that feature custom-designed graphics, adding a visual side you usually can't find in traditional shades. They bring thematic elements and artistic expression you can use to personalize your space. Graphic shades are available in different types, such as roller shades or cellular shades, giving you plenty of customization options.   These designs allow you to complete your interior decor with matching artwork or provide you with a visual statement in a way traditional shades cannot. Enhance your space's ambiance or mood by bringing your inspirations right into your room.   ## Benefits of Graphic Shades The benefits of graphic shades go beyond just their visual appeal. Depending on the materials used, they can offer enhanced privacy due to varying levels of coverage and opacity and allow you to combine discretion and style, whether in a residential or office setting.   The materials in graphic shades also often provide very effective UV protection, shielding you and your home's interior from harmful rays without losing any of their vibrancy.   However, the most compelling reason is the ability of graphic shades to reflect your personal or brand identity. Custom designs can be tailored to match your personal or business's aesthetic, giving you a powerful tool to express yourself or your corporate branding.   ## Choosing the Right Design Selecting the right design for your graphic shades is influenced by several factors, such as the purpose of the space, your existing decor and your personal preferences. For example, a beautiful and serene nature-themed shade might suit a relaxing living room or bedroom, while a vibrant abstract pattern could give a creative workspace a boost of energy.   Whether your preference gravitates toward cityscapes, minimalist lines or botanicals, keep your existing decor in mind to ensure it will all come together and enhance the overall ambiance of the space.   ## Installation Process Installing graphic shades is pretty straightforward, but for the best results, professional installation is often recommended. The installation starts with precise measurements to ensure the shades fit perfectly into your window frame. We recommend measuring each window twice just to make sure the measurements are correct because you don't want to end up with shades that don't fit well. Next up is the mounting process, where you attach and adjust the shades to guarantee they look and work great.   The benefit of professional installers is their expertise, which guarantees the shades will not only look great but also function perfectly, so you won't have to worry about potentially making a mistake.   ## Maintenance and Care Like most other things, maintaining your graphic shades is essential if you want them to look and work great. Depending on the material, there are different cleaning methods, so check the manufacturer's instructions to ensure you use the appropriate methods.   For most graphic shades, a gentle wipe-down with a soft cloth is enough to remove dust and debris. However, shades located in areas with higher exposure to grime or moisture, such as kitchens or bathrooms, might need to be cleaned more frequently.   If any repairs are needed, we recommend contacting professional services to handle common issues, such as reattaching a loose shade or fixing a malfunctioning mechanism. Overall, sticking to a maintenance schedule will extend your shades' lifespan and ensure they're doing their job as shades properly.   ## Why Choose Off Cut Shades for Your Graphic Shades [Off Cut Shades](/) is your choice for [graphic shades](/shop) and other window treatments in Toronto and beyond. We're committed to providing high-quality shades with the best style and functionality and customer satisfaction, with the added benefit of a wide range of customization options and innovative designs. Based on a solid foundation of excellent customer service and strong craftsmanship, we take great pride in using only top-quality materials and providing a smooth and satisfying experience from selection to installation to ensure you can find the perfect graphic shades for any room, whether you're looking for new trends or unique offerings.   All of our shades and blinds are 100% proudly made in Canada. We're committed to craftsmanship and attention for every order. If you have further questions, contact Off Cut Shades today at 416-285-6001 or complete [our convenient online form](/contact).

Read Article
Privacy Meets Style: Why Choose Bottom Up Window Shades
5 min read

Privacy Meets Style: Why Choose Bottom Up Window Shades

Bottom-up window shades are a great alternative to traditional window coverings. They offer complete light control and enhanced privacy with a completely different concept. These shades are raised from the bottom, so you can enjoy privacy while allowing natural light to filter in.   So, why should you forgo the limitations of traditional window coverings and take advantage of bottom-up shades? Let's find out.   ## The Benefits of Bottom-Up Window Shades Bottom-up window shades are a very versatile choice for modern living. They can be installed in any room and easily adapted to different window sizes. Whether you install them in a living room, bedroom, or kitchen, they provide consistent performance and visual appeal. Being able to adjust them for the best balance between privacy and light makes them a great choice.   But bottom-up window shades don't just have functional benefits; they are also an aesthetic chameleon you can tailor to fit your needs exactly. They're available in many different designs, colours, and materials, so you can be sure they'll match any interior decor, whether you're favouring a contemporary, traditional, or eclectic style. Your choices range from simple light filtering to blackout.   Finally, bottom-up window shades also come with significant energy efficiency benefits. They offer effective insulation, helping you keep the indoor temperature comfortable and reducing the need for heating or cooling. This can add up to substantial energy savings, making the shades a cost-effective choice. Over the past few years, the popularity of bottom-up shades has continuously grown as they meet the preferences of homeowners looking for the best balance between style and practicality.   ### **Enhanced Privacy and Light Control** The superior privacy and light control of bottom-up window shades are probably their biggest advantage. With traditional window coverings, you can only achieve complete privacy when they are fully drawn, limiting your options when it comes to light control. The unique design of bottom-up shades with their innovative bottom-up mechanism gives you the adjustability and flexibility to raise the blind just high enough to guarantee your privacy while allowing natural light to flood the room at the top. This feature is particularly beneficial in towns where homes are closely together.   ### **Style and Customization Options** An additional benefit is their customizability. Whether you favour a contemporary or classic style, bottom-up shades offer a wide variety of different fabrics, colours, and patterns to allow you to find the perfect shade for your interior decor. From gentle light filtering by light, airy materials to heavier, more opaque fabrics to block light entirely and give even more privacy protection, you can fully tailor them to your specific needs and preferences.   Whether you want the shades to blend into your colour scheme or stand out with bold, vibrant hues, you can fully personalize them. Add to that the different patterns and textures you can use to add dimension, and you can see how these shades can completely reflect your style.   ### **Energy Efficiency and Sustainability** Bottom-up window shades offer excellent energy efficiency beyond the aesthetic and functional benefits. They provide:   * Thermal insulation. * Reducing heat loss in winter and preventing excessive heat gain in summer. * Bringing you cost savings on your utility bills.   This also allows you to reduce your carbon footprint and save resources, making bottom-up shades an eco-friendly choice.   Many manufacturers offer shades made from recycled or renewable materials, reducing their environmental impact. So, take advantage of lowering energy use and boosting your home's efficiency.   ### **Installation and Maintenance** Installing bottom-up window shades is straightforward and can be made even easier with professional help. Overall, these shades require minimal maintenance to keep them working properly, making them a welcome addition to your home.   The installation typically involves measuring the window dimensions accurately to ensure the shade fits perfectly. Professional installers can ensure that the shades are mounted securely and operate smoothly. While you can go DIY if you have some experience with installations, a professional installation guarantees the best results, particularly for custom-sized or more complex installations.   In most cases, regular dusting and occasional spot cleaning with a mild detergent will keep your shades looking new. This also helps with their longevity, which can last for many years, providing a long-term solution for your window covering needs. Avoid harsh chemicals when cleaning, ensure they're properly aligned when you adjust them, and periodically check the mechanisms to ensure they're still operating smoothly.   ## Making the Stylish and Smart Choice Bottom-up window shades are a stylish and smart choice that combines the best of enhanced privacy, light control, and aesthetic appeal. They're an excellent choice for modern homes because of their functionality and unique design, which allows you to balance privacy and light perfectly.   Their customizable nature gives you countless options to ensure they fit your style and decor, while their easy installation and low maintenance requirements make them a convenient and reliable choice.   ## Why Choose Off Cut Shades for Your Bottom-Up Window Shades Off Cut Shades is your choice for bottom-up window shades and other [window treatments](/) in Toronto and beyond. We're committed to providing high-quality shades with the best style and functionality, with the added benefit of a wide range of customization options and innovative designs. Based on a solid foundation of excellent customer service and strong craftsmanship, we take great pride in providing a smooth and satisfying experience from selection to installation to ensure you can find the perfect window shades for any room.   All of our shades and blinds are 100% proudly made in Canada. We're committed to craftsmanship and attention for every order. If you have further questions, contact Off Cut Shades today at 416-285-6001 or complete [our convenient online form](/contact).

Read Article
Selecting the Best Skylight Roller Shades for Your Home
5 min read

Selecting the Best Skylight Roller Shades for Your Home

Skylights are a great way to flood a room with natural daylight and give it a bright, open feeling. However, their location can make it a bit challenging to darken the room and keep the heat out. Enter skylight roller shades, a great option that helps you control the light, provide insulation, and enhance privacy all in one.   They basically combine design integration with your home's aesthetics while ensuring optimal light adjustability, glare reduction, energy efficiency, and temperature regulation.   ## Understanding Skylight Roller Shades Let's first have a look at what skylight roller shades are. They differ significantly from regular window shades as they are specifically designed for the unique angles and positions of skylights. Being tailored to these specific requirements gives you complete light control, insulation, and privacy.   ## Types of Skylight Roller Shades There are different variations of skylight roller shades on the market, starting with the type. Manual skylight roller shades are hand-operated, making them straightforward and cost-effective. They're easy to use but might require a pole or ladder to adjust if located in a high or hard-to-reach spot.   If you don't want to risk any balancing acts, there also are motorized skylight roller shades, which give you the convenience of automation with a simple button on a remote control. You can even integrate them into your home's smart home system, giving you even more functionality.   But that's not your only option. You can also choose from various materials that cater to different needs, such as light-filtering fabrics, blackout materials, and UV protection layers. Consider durability and maintenance when selecting the material for your skylight roller shades. High-quality materials might cost a bit more upfront but can also ensure longevity and ease of care.   ## Measuring for Skylight Roller Shades Accurate measurements are crucial, especially for skylights, as they often have very little wiggle room. For the best results, use a steel tape measure to measure the width and height of the skylight opening. Ensure the measurements are as exact as possible to avoid any gaps or overlaps, as custom-fit shades give you the best results in terms of coverage and functionality. If you have irregularly shaped skylights, you'll need some special considerations.   When measuring, always double-check your measurements to ensure accuracy. Few things are more frustrating than a shade that doesn't fit properly. Also, try to avoid common mistakes such as measuring only one side, estimating measurements, or not accounting for frame depth.   ## Installation Guide for Skylight Roller Shades You can install skylight roller shades yourself or let the professionals handle it. If you want to go down the DIY installation route:   • Get the necessary tools, including a drill, screws, a level, and the manufacturer's instructions.   • Follow them closely to ensure a proper installation.   • Ensure you follow all safety tips and double-check everything for accuracy.   Hiring a professional can save you time and ensure a proper installation. Professionals have the experience and tools to deal with any issues that may come up during the installation, such as misalignment or difficult access, that can be solved with the right tools and techniques.   ## Benefits of Motorized Skylight Roller Shades Motorized skylight roller shades offer several advantages, making them popular for modern homes. They add a level of convenience manual shades can't match by allowing you to control them with a remote control or even integrate them into your smart home system, so you get full automation and control from whichever device you use for the system.   In addition, motorized skylight roller shades can be equipped with additional features such as smart sensors and programmable settings. This will allow you to boost energy efficiency by having the shades automatically adjust to changing light and temperature conditions.   ## Choosing the Right Fabric for Your Needs The fabric will affect both the functionality and aesthetics of your skylight roller shades. Depending on your light control or privacy needs, you can choose from several options, from light-filtering fabrics and blackout materials to UV protection layers. Consider how much natural light you want to allow in. Light-filtering fabrics provide soft light, while blackout materials offer complete darkness.   Another factor to consider is privacy, especially if your skylight is in the bedroom or bathroom. In those cases, choose fabrics that give full coverage and opacity. Finally, the colour and design should also complement your home's interior, of course, unless you want to make a design statement.   ## Energy Efficiency and Insulation Benefits We already briefly mentioned skylight roller shades' energy efficiency and insulation properties, which can help lower your energy bills. Skylight roller shades can reduce heat gain in the summer and heat loss in the winter, improving your home's overall energy efficiency and reducing your environmental impact.   Overall, these shades provide an additional layer of insulation, helping you regulate indoor temperatures and reduce the use of your heating and cooling systems. If you choose the motorization option, you'll also be more likely to adjust your shades whenever needed, thanks to the convenient handling.   ## Maintaining and Cleaning Skylight Roller Shades Regular maintenance and cleaning are essential to ensure the longevity and performance of your skylight roller shades. Regular care includes dusting and checking the shades for any wear and tear so you can address all issues quickly and avoid them from getting worse.   Different fabrics also require different cleaning methods, so only use the appropriate cleaning solutions and techniques to get the most durability and performance out of your shades.   ## Frequently Asked Questions about Skylight Roller Shades Homeowners often have common questions and concerns about skylight roller shades. Among the most frequent are questions about coverage, operation and costs. Generally, skylight roller shades offer full coverage, ensuring privacy and light control. Motorized shades add a great deal of convenience and can be a worthwhile investment for ease of use. They also help with energy efficiency and safety if the skylight is in a hard-to-reach or high location. The cost will vary depending on the type, fabric, and additional features, but overall, there are shades to match any budget.   As far as installation, maintenance, and durability go, you can do a DIY installation if you have basic handyman skills and the confidence to tackle a project like this. In contrast, a professional installation will ensure a flawless setup. In terms of maintenance, regular care and material-appropriate cleaning methods are essential to ensure you can enjoy your shades for a long time with total durability and continued performance.   ## Get Your Skylight Roller Shades Today Skylight roller shades are a great way to take over light and privacy control and enjoy a boost in energy efficiency as well. With a wide range of fabrics and features, you can find the right shade for your requirements and budget with Off Cut Shades.   Off Cut Shades is your choice for [skylight roller shades](/shop/info/roller) and other [window treatments in Toronto](/) and beyond. We're committed to providing high-quality shades with the best style and functionality, with the added benefit of a wide range of customization options. Based on a solid foundation of excellent customer service, we take great pride in providing a smooth and satisfying experience from selection to installation to ensure you can find the perfect window shades for any room.   All of our shades and blinds are 100% proudly made in Canada. We're committed to craftsmanship and attention for every order. If you have further questions, contact Off Cut Shades today at 416-285-6001 or complete [our convenient online form](/contact).

Read Article
Choosing the Right Window Shades for Your Living Room
5 min read

Choosing the Right Window Shades for Your Living Room

Choosing window shades for your living room is not just a question of aesthetics but also functionality, so selecting the right shades is more important than many of us initially think. In most homes, the living room is a central room where we go to relax and unwind, where our families get together, and where we entertain guests. So, while the decor and style play a role, there are also functionality factors to consider, such as light control or privacy, your budget, maintenance, and safety.   In this blog, we'll take a closer look at choosing the right shades for your living room and which window shade styles work best for your needs.   ## Understanding Your Living Room Needs It all begins with what your living room needs. In every home, the requirements of a living room and its window treatments are unique, so the first step to choosing the perfect window shades is to understand these requirements. The most common considerations are light control, privacy, and decor and style, which can help you bring the room together.   ### **Light Control** Effective light management is one of the most critical functions of window shades, not just in a living room. The requirement of how much natural light you want to allow into your living room can greatly vary between different activities and times of day. If you're going to read or watch TV, you'll likely want to prevent the full brightness of the sun from causing glares or an outright block of sunlight with blackout shades. On the other hand, when you're entertaining guests, you might instead want a soft light filter that still keeps the room bright and inviting, so your choice of shades will influence the room's atmosphere and functionality.   ### **Privacy** Another critical set of factors involves privacy. Depending on the location of your living room and your privacy requirements, your choice could range from full blackout to sheer shades and everything in between. For example, if your living room faces a busy street, you'll likely have different requirements than if it faces a secluded and fenced-in backyard. You can customize your window shades to offer different levels of seclusion, allowing you to feel secure and comfortable without worrying about who might see what.   ### **Décor and Style** Of course, your choice of window shades should also fit into your overall decor and style. Off Cut Shades can help you with a wide range of materials, colours, and designs that will allow you to find the right combination to match your existing furniture and colour schemes. Whether you prefer a minimalist look or a more elaborate design, the right shades can boost your living room not just functionally but also aesthetically.   ## Types of Window Shades With a wide range of window shade types available for your living room, it's critical you understand their respective pros and cons to make an informed decision about the perfect choice. Let's take a look at some of the most common options and what could make them the perfect choice.   ### **Roller Shades** If you are looking for a modern and sleek look, [roller shades](/shop/info/roller), with their minimalist design, are a great choice. They offer a clean look and are easy to use, making them an excellent match for any modern living room. They also come in a wide variety of fabrics and opacities so that you can tailor both look and functionality to your specific light control and privacy needs.   ### **Sheer Shades** As the name suggests, [sheer shades](/shop/info/sheer) are a versatile choice known for their light-diffusing qualities. They offer a gentle solution that balances privacy and natural light. They are an excellent choice for living rooms requiring a more gentle light while still maintaining some level of privacy.   ### **Motorized Shades** Motorized shades can bring great convenience and a modern touch to your living room. Most types of shades can be equipped with a motor, allowing you to control them remotely or integrate them into a smart home system, boosting the functionality of your living room. They are a great choice if you have hard-to-reach windows or limited mobility, keeping the operation of your window shades safe at all times.   ## Factors to Consider When Choosing Window Shades So, when you enter the selection phase for window shades for your living room, you should consider a couple of factors, including budget, maintenance, and child and pet safety.   ### **Budget** For many homeowners, the budget significantly influences which window shades are in closer contention. When operating on a tight budget, compare the costs of different types of shades to help you find cost-effective options that will allow you to meet your requirements without having to compromise on quality. Checking sales at retailers or doing some research online can save you considerable money.   ### **Maintenance** Maintenance requirements can vary widely depending on which type of window shade you look at. For example, Fabric shades can be more challenging to keep clean than wooden blinds, and the same goes for different mechanisms. Researching these requirements can help you choose the right shades to match your lifestyle and preferences.   ### **Child and Pet Safety** Child and pet safety are critical considerations when selecting window shades. The most significant risk factor is cords that small children and pets could get tangled in, so cordless designs and safety locks can be a very efficient way to prevent accidents and ensure a safe living environment for the whole family.   ## Why Choose Off Cut Shades? Off Cut Shades is your choice for [living room window treatments](/shades/living-room-window-shades) in Toronto and beyond. We're committed to providing [high-quality shades](/) with the best style and functionality, with the added benefit of a wide range of customization options. Based on a solid foundation of excellent customer service, we take great pride in providing a smooth and satisfying experience from selection to installation to ensure you can find the perfect window shades for your living room. All of our shades and blinds are 100% proudly made in Canada. We're committed to craftsmanship and attention for every order. If you have further questions, contact Off Cut Shades today at 416-285-6001 or complete [our convenient online form](/contact).

Read Article
When To Motorize Shades?
5 min read

When To Motorize Shades?

Automating your window treatments is an excellent way to enhance the convenience and technological sophistication of your home. While it may entail an additional expense, the benefits of having automatic shades are unparalleled. Motorization is not merely a trendy upgrade, but a practical solution for a variety of situations.   # **Smart Blinds for People with Limited Mobility** ![Smart](/images/blog/when_to_motorize_shades/Smart.jpg) For individuals with limited mobility, [motorized window treatments](/motorized-solutions) can be a valuable option. Arthritis sufferers or those with other mobility impairments may find operating window treatments with cords or wands challenging. By simply pushing a button on a remote, barriers to ease and comfort in the home can be alleviated.   # **Motorized Shades on Hard-To-Reach Windows** ![Hard-To-Reach](/images/blog/when_to_motorize_shades/Hard-To-Reach.jpg) Automated window treatments are also a practical solution for hard-to-reach blinds, such as those found in staircases, great rooms, or hall areas. Prior to the availability of motorization, options for these unreachable windows were limited, resulting in unsightly extended cords or wands. Motorization allows for easy access and a clean look. Off Cut Shades also offers solar panels that are affixed to the inside of the windowpane, to allow the use of battery motors without the need for manual recharging.   # **Smart Shades and Obstructed Windows** ![Obstructed Windows](/images/blog/when_to_motorize_shades/Obstructed-Windows.jpg) In cases where furniture obstructs access to window treatments and their controls, motorized window treatments offer a clever solution. By enabling the operation of window treatments without having to lean over furniture or fixtures, lighting and privacy can be controlled with ease.   # **Automated Blinds for Side-By-Side Windows** ![Side-By-Side](/images/blog/when_to_motorize_shades/Side-By-Side.jpg) For those with multiple windows next to one another, motorization can synchronize their operation. Multiple windows can be lowered and raised simultaneously and left partially raised or lowered at the same height. This option is particularly useful for bay or bow windows.

Read Article
Window Shades on a Budget
5 min read

Window Shades on a Budget

Purchasing a new home is a thrilling experience, but amidst the flurry of positive emotions there is the added stress of creating a comfortable living space on a budget. Window treatments, like appliances, furniture, and lighting, typically have a predetermined budget for each homeowner. Our experts can assist you in selecting the ideal shades and options for your home and budget.   ## **Do not hesitate to disclose your budget** Often, customers are hesitant to reveal this information, fearing they may be presented with a lower-quality product. However, our design consultants are trained to work within your budget. Simply provide them with rough estimates of your window sizes, and they will offer quotes on various products in different price ranges. This way, you can determine how much you want to invest not only in your home but also in each individual room. Visit our showroom, and our trained design consultants will assist you in narrowing down your choices with their expertise.   ## **Plan and Prioritize Your Rooms** Once you have established a budget for your project, it is essential to devise a strategic plan. Our showroom offers a range of products that can cover an entire house without exceeding your budget, while still maintaining a beautiful, polished appearance. Alternatively, it is important to determine which rooms are of utmost importance to you. Some customers may prioritize living areas to impress guests, while others may prioritize their master bedroom as a personal sanctuary. Regardless of the room, it is crucial to focus on the priority area first. Investing in the priority room while keeping other rooms within a lower budget can help achieve the overall project cost.   ## **Consider the Requirements of Each Room** ![Consider the Requirements of each room](/images/blog/budget_friendly_window_shade_options/IMG_20200623_144011.jpg "Consider the Requirements of each room") Various requirements may influence your selection of products. For instance, if you require blackout shades for a specific room, such as a bedroom, and have a limited budget, you may be inclined towards [roller shades](/shop/info/roller) or other cost-effective window treatments that darken the room. However, if you do not require blackout or room-darkening shades in a bedroom, there may be alternative options available to you. Additionally, you may have a room with exceptionally large windows or windows in a damp or humid area, such as a bathroom or basement with inadequate ventilation. We can assist you in navigating all your unique requirements while staying within your budget.   ## **Lastly, DIY Installation** ![DIY Installation](/images/blog/budget_friendly_window_shade_options/IMG_3965.jpg "DIY Installatin") An alternative method to save on costs is to undertake the installation yourself or enlist the assistance of a capable friend or family member. The inclusion of labour expenses can significantly increase the overall expenditure, particularly when dealing with many windows. It is highly recommended that our professionals conduct the measurements for a nominal fee. However, once the measurements have been taken, most products are relatively straightforward to install. This approach can result in cost savings that can be allocated toward the window treatments. In general, it is advisable to determine a comfortable budget for the entire project. It is important not to become overwhelmed by the process and to tackle one room and window at a time. Prioritize the rooms that require immediate attention and focus on them first. Once this has been accomplished, assess the remaining budget, and consider alternative options to ensure that the total project cost is within reach. Our design consultants are available to provide guidance and support throughout the process. Ultimately, regardless of the budget, you will receive a high-quality blind at a price point that suits your needs.

Read Article
The Difference Between Blinds and Shades
5 min read

The Difference Between Blinds and Shades

If you are seeking clarification on the differences between window blinds and window shades, it is important to note that blinds consist of slats that can be tilted, while shades roll up or push up entirely in one piece. While they share some similarities, they are also quite distinct from one another. Our team is pleased to provide further insight into what distinguishes a window covering as a blind or a shade so that you can select the window treatment that best suits your needs. Please read on for a comprehensive comparison of blinds versus shades.   ## **What are Window Blinds?** Window blinds are window coverings that are composed of slats that can be tilted open and closed to control privacy and light. Horizontal or "venetian" blinds can be raised up and lowered down to open, while vertical blinds open by sliding left to right. In either style, the slats can be adjusted to meet a wide range of needs, from fully open to fully closed.   ## **What are Window Shades?** ![What are Window Shades](/images/blog/the_difference_between_blinds_and_shades/window.jpg)   Window shades are flat window coverings made from fabric that roll up to open. Of course, there are some exceptions to this general rule. One of the many benefits of shades is the ease with which they roll up and virtually disappear. While the slats of a blind stack at the top to open, a shade rolls up as you raise it, giving you an unobstructed view through the window. If you prefer a clear view through your window when you don't need to cover it, a shade will be a better choice. Some popular types of shades are [roller shades](/shop/info/roller), [zebra shades](/shop/info/zebra), sunscreen shades, roman shades, and zebra shades. Shades offer more options for the mechanism by which you raise and lower your window treatment, compared to blinds, including motorization – an ideal solution for large groups of windows or for those that are difficult to access.   ## **Roller Shades** ![Roller Shades](/images/blog/the_difference_between_blinds_and_shades/roller.jpg)   Roller shades are the classic window covering that you picture when you think of a fabric shade that rolls up and out of the way. New mechanisms like Neo EZ Pump, Glide Bar, Snug Chainless, and even motorized operation are available now and bring new comfort and ease to this old favourite. Coupled with the widest selection of fabrics of any other window treatments, roller shades really offer something for everyone.   ## **Sunscreen Shades** ![Sunscreen Shades](/images/blog/the_difference_between_blinds_and_shades/sunscreen.jpg)   Sunscreen shades have a roller shade construction but are made from a fabric with a unique purpose, to greatly reduce the ultraviolet rays and glare from the sun while still allowing natural light to enter the room. They are ideal for rooms with large windows or for those who desire a clear view of the outdoors without sacrificing privacy.   ## **Roman Shades** ![Roman Shades](/images/blog/the_difference_between_blinds_and_shades/roman.jpg)   Roman shades are a classic window treatment that adds elegance and sophistication to any space. They are available in a variety of fabrics, from zebra to blackout, and can be customized with decorative trims and embellishments.   ## **Zebra Shades** ![Zebra Shades](/images/blog/the_difference_between_blinds_and_shades/zebra.jpg)   Zebra shades are a versatile window treatment option that combines the softness of fabric shades with the adjustability of slats. Despite their partially sheer construction, they offer privacy and can even darken a room when closed. Zebra shades are a stylish addition to any space and are constructed with adjustable strips of contrasting fabric.   ## **Fabric Options** ![Fabric Options](/images/blog/the_difference_between_blinds_and_shades/options.jpg)   In addition to Zebra shades, Roller and Roman Shades are available in a range of materials including sheer, light-filtering, and blackout options. Blackout shades are particularly useful for improving sleep quality and are a popular choice for children's rooms and nurseries. Light-filtering shades provide privacy while still allowing some natural light to filter through, making them a decorative and practical choice for many spaces. At Off Cut Shades, we understand that selecting the right window treatment can be a daunting task. That is why our team provides comprehensive information and guidance to help you make an informed decision. Whether you are looking for blinds, shades, or any other window treatment, we have a wide range of options to suit your needs and style preferences. Contact us today to schedule a consultation and let us help you transform your space with beautiful and functional window coverings.

Read Article
When is it a Good Idea to Order Reverse Roll Roller Shades?
5 min read

When is it a Good Idea to Order Reverse Roll Roller Shades?

Reverse roll roller shades are typically ordered when there are obstructions within the window opening or when a specific aesthetic is required. In a standard [roller shade](/shop/info/roller), the fabric rolls off the top of the shade and hangs down closer to the glazing. In a reverse roll configuration, the fabric rolls off the front of the roll and hangs closer to the front of the window frame. ## Situations where reverse roll roller shades are appropriate: 1. Shallow Window Frames: If you have shallow window frames or limited clearance between the top of the window and any obstacles like window cranks or handles, a reverse roll can help ensure that the shade fits properly without interference. 2. Desired Aesthetic: Some people prefer the look of a reverse roll because it creates a sleeker, more streamlined appearance. By rolling off the front, the fabric is closer to the front of the window, resulting in a cleaner and more minimalistic look. 3. Light Control: Depending on your window's position and the direction of sunlight, a reverse roll can provide better light control. By positioning the shade closer to the front of the window, it can help reduce light gaps and improve privacy. 4. Functional Considerations: In certain cases, such as when installing roller shades in a door frame, a reverse roll may be necessary to ensure that the shade operates smoothly and does not interfere with the door's movement. Ultimately, the decision to order reverse roll roller shades depends on your specific needs and preferences. It's always a good idea to consult with a professional or the manufacturer to determine the best mounting option for your particular window and situation. Off Cut Shades offers free expert advice on choosing window shades that work best with your home. Please feel free to make an appointment by calling us.

Read Article
Sunscreen Shades: Balancing Light and Privacy with Stylish Functionality
5 min read

Sunscreen Shades: Balancing Light and Privacy with Stylish Functionality

When it comes to achieving the ideal balance of natural light and privacy in your space, sunscreen shades offer a stylish and functional solution. They have gained popularity for their ability to filter sunlight while maintaining an unobstructed view of the outside world. In this post, we'll delve into the features and benefits of sunscreen shades, helping you understand how they can transform your living or workspace into a haven of comfort and style. ## What are Sunscreen Shades? ![Sunscreen Shades](/images/blog/sunscreen_shades/sunscreen_1.jpg "Sunscreen Shades") [Sunscreen shades](/shop/info/roller), also known as solar shades, are a popular window treatment made from a specially engineered fabric that blocks harmful UV rays while allowing a pleasant amount of light to pass through. They are an excellent choice for maintaining privacy, reducing glare, and protecting your furniture and flooring from sun damage. ## Opacity Levels: What Do They Mean? ![Sunscreen Shades Opacity](/images/blog/sunscreen_shades/opacity.jpg "Sunscreen Shades Opacity") The opacity level refers to how much light is allowed to pass through the fabric, and it is typically expressed as a percentage. The lower the percentage, the higher the level of light blockage. For example, a shade with 1% opacity will provide the highest level of light filtering and privacy, while a shade with 14% opacity will allow more light to pass through. ## Selecting the Right Opacity Level Selecting the right opacity level for your sunscreen shades depends on various factors, including the purpose of the space, desired level of privacy, and the amount of natural light you want to allow in. Let's explore the different opacity levels and their recommended uses: - [1% Opacity](/shop/info/roller): Shades with 1% opacity are ideal for spaces that require maximum privacy and light control. These shades effectively block out the majority of light, making them suitable for bedrooms, media rooms, or any area where you want to create a cozy and secluded ambiance. - [3% to 5% Opacity](/shop/info/roller): Shades with 3% to 5% opacity strike a balance between privacy and preserving outside views. They provide moderate light filtering while maintaining a certain level of visibility to the outside. These shades are well-suited for living rooms, dining areas, and offices, where you want to enjoy natural light while still maintaining a degree of privacy. - 10% to 14% Opacity: Shades with 10% to 14% opacity offer a higher degree of light penetration, making them suitable for spaces where maintaining outside views is a priority. These shades allow ample natural light to enter the room while reducing glare and protecting against harmful UV rays. They work well in spaces that require a brighter, more open feel. The opacity level of sunscreen shades plays a crucial role in determining the amount of natural light and outside views you can enjoy while maintaining privacy. It's important to choose the right opacity level based on your specific needs and preferences. Whether you desire maximum light control in a bedroom or a more open and airy feel in a living room, understanding the significance of opacity levels will help you make an informed decision. ## Sunscreen Shade Benefits ![Sunscreen Benefits](/images/blog/sunscreen_shades/sunscreen_2.jpg "Sunscreen Benefits") Sunscreen shades offer a range of benefits that go beyond light control and privacy. Let's explore the advantages of incorporating sunscreen shades into your space: - UV Protection: Sunscreen shades are designed to block harmful UV rays, which can cause damage to your furniture, flooring, and artwork over time. By installing sunscreen shades, you create a protective barrier that reduces the fading and deterioration of your valuable belongings, allowing them to retain their original beauty for longer. - Energy Efficiency: Sunscreen shades contribute to energy efficiency by reducing heat gain during hot summer months and heat loss during colder seasons. By blocking out direct sunlight, these shades help maintain a comfortable temperature indoors, reducing the reliance on heating and cooling systems. This, in turn, can lead to energy savings and lower utility bills. - Glare Reduction: Whether you're working on a computer, watching TV, or simply enjoying a relaxing moment, glare can be a major inconvenience. Sunscreen shades effectively reduce glare by diffusing sunlight and minimizing reflections on screens and glossy surfaces. This improves visibility and enhances your overall viewing experience. - Enhanced Privacy: With their varying opacity levels, sunscreen shades provide the privacy you desire without completely sacrificing natural light. They allow you to enjoy your space without compromising your sense of security. *** Incorporating sunscreen shades into your home or office brings numerous benefits, from protecting your belongings to improving energy efficiency and enhancing your overall comfort. With their versatility and functionality, these shades are an excellent investment for any space. Remember, our team is here to assist you in finding the perfect [sunscreen shades](/shop/info/roller) that cater to your unique requirements. [Contact us](/contact)today to discover the full range of options and enjoy the benefits of sunscreen shades in your home or office.

Read Article
A Comprehensive Guide to Window Treatments: Exploring Your Options
5 min read

A Comprehensive Guide to Window Treatments: Exploring Your Options

Windows are not just functional elements of a home; they are also an opportunity to enhance the aesthetics and atmosphere of a space. That's where window treatments come in. With a wide array of available options, you can elevate your windows and transform any room into a stylish and functional haven. In this comprehensive guide, we will take you through the most popular window treatments, exploring the different types and their unique features. Whether you're seeking privacy, light control, insulation, or a touch of elegance, there is a window treatment option for your needs. ## 1. Curtains and Drapes ![Curtains and drapes](/images/blog/a_guide_to_window_treatments/Curtains.jpg "Drapes") Curtains and drapes are classic window treatments that have stood the test of time. They offer both functionality and style, allowing you to enhance the overall look and feel of your space. Curtains are typically made from lighter fabrics and are ideal for adding a touch of elegance to a room. They come in various lengths, styles, and patterns, making them versatile enough to match any decor. Drapes, on the other hand, are made from heavier fabrics and provide more insulation and light control. They are an excellent choice for bedrooms, living rooms, or any space where privacy and light blocking are desired. One of the key advantages of curtains and drapes is their ability to transform the ambiance of a room. Sheer curtains can create an airy and ethereal feel, allowing natural light to filter through while maintaining privacy. On the other hand, thicker curtains or blackout drapes can completely block out light, providing an ideal environment for restful sleep or home theatre setups. When choosing curtains or drapes, consider factors such as fabric type, colour, pattern, and length. Lighter colours and sheer fabrics can make a room feel brighter and more spacious, while darker colours and heavier fabrics can add a sense of coziness and warmth. The length of the curtains or drapes can also play a role in visually expanding or defining the height of a window or room. Proper installation and measurement are essential for achieving the desired look and functionality. Ensure that the curtains or drapes are wide enough to cover the window adequately and extend beyond the frame to avoid light gaps. Additionally, consider using tiebacks or decorative hardware to enhance the visual appeal and allow for better control of natural light. Curtains and drapes offer endless possibilities for customization and can be easily switched out or layered to match changing seasons or personal preferences. Their versatility makes them a popular choice for homeowners looking to add a touch of elegance and functionality to their windows. ## 2. Blinds ![Blinds](/images/blog/a_guide_to_window_treatments/Blinds.jpg "Blinds") With their adjustable slats, blinds give you precise control over the amount of light and privacy you desire. One popular type of blind is the Venetian blind. These blinds feature horizontal slats that can be tilted to control the direction and intensity of sunlight entering the room. Venetian blinds are available in various materials such as aluminum, wood, or faux wood, allowing you to choose a finish that complements your interior decor. Vertical blinds are another versatile option, particularly suitable for large windows, sliding doors, or rooms with a vertical orientation. They consist of vertical slats that can be rotated to control light and privacy. Vertical blinds are available in fabric, vinyl, or PVC materials, offering a range of colours and textures to match your style. Mini blinds, as the name suggests, are a more compact version of Venetian blinds. They are characterized by smaller slats, typically made of aluminum or vinyl. Mini blinds are an affordable choice, especially for smaller windows or spaces. One aspect to keep in mind is that blinds' slats can easily accumulate dust, making them more challenging to clean and requiring frequent maintenance to keep them looking fresh and free from allergens. ## 3. Shades Shades offer a versatile and stylish window treatment solution, combining functionality with an array of design options. They are designed to fit seamlessly within your window frame, providing a clean and tailored look. ![Roller Shades](/images/blog/a_guide_to_window_treatments/Roller.jpg "Roller Shades") One popular type of shade is the roller shade. [Roller shades](/shop/info/roller) are made of a single piece of fabric that rolls up and down using a spring-loaded mechanism, a cord loop system or a motor. They are available in a wide variety of fabrics, patterns, and [opacities](/guides/productselection), allowing you to control light and privacy levels. Roller shades are an excellent choice for achieving a modern and minimalist aesthetic. ![Roman Shades](/images/blog/a_guide_to_window_treatments/Roman.jpg "Roman Shades") Roman shades are another popular option, offering a combination of elegance and versatility. They are characterized by horizontal folds that create a soft and graceful appearance when the shade is lowered. Roman shades come in various fabric choices, from sheer and light-filtering to room-darkening options, allowing you to achieve the desired ambiance in any room. ![Cellular Shades](/images/blog/a_guide_to_window_treatments/Honeycomb.jpg "Cellular or Honeycomb Shades") Cellular shades, also known as honeycomb shades, are renowned for their energy-efficient properties. They feature a unique cellular construction that traps air, providing insulation and reducing heat transfer. Cellular shades are available in various opacities and can help regulate temperature while offering privacy and light control. ![Sheer Shades](/images/blog/a_guide_to_window_treatments/Sheer.jpg "Sheer Shades") [Sheer shades](/shop/info/sheer) combine the softness of curtains with the functionality of blinds. They feature fabric vanes suspended between two layers of sheer fabric, allowing for light diffusion and privacy. Sheer shades offer a delicate and elegant look while filtering the sunlight and creating a gentle ambiance in the room. ![Banded or Zebra Shades](/images/blog/a_guide_to_window_treatments/Banded.jpg "Banded or Zebra Shades") Additionally, one of the most innovative and versatile window treatment options is the [banded shade](/shop/info/zebra), also known as zebra shades. These shades feature alternating horizontal bands of sheer and solid fabric panels that can be adjusted to achieve the perfect balance of light control and privacy. With a simple pull of the cord or a gentle tug, the bands align to allow natural light to filter through the sheer fabric, creating a soft and ethereal ambiance. Alternatively, they can be aligned to overlap, providing privacy and blocking out unwanted sunlight. Banded shades offer a modern and chic aesthetic, adding a touch of sophistication to any room. Their versatility makes them an ideal choice for both residential and commercial spaces, offering a harmonious blend of style and functionality. Shades provide an opportunity to customize your window treatments based on your preferences and needs. Consider factors such as fabric type, colour, opacity, and operating mechanisms when selecting shades. Cordless or motorized options offer convenience, ease of use, and enhanced child safety. ## 4. Shutters: ![shutters](/images/blog/a_guide_to_window_treatments/Shutter.jpg "Shutters") Shutters are a timeless and elegant choice for window treatments, adding a touch of sophistication and functionality to any space. They are often seen as a long-term investment due to their durability and ability to enhance the value of a home. Interior shutters, particularly plantation shutters, are a popular choice known for their classic appeal. They feature wide, horizontal slats that can be adjusted to control light, airflow, and privacy. Plantation shutters are typically made of wood or faux wood materials, offering a natural and warm aesthetic that complements a variety of interior styles. One of the significant advantages of shutters is their ability to provide excellent light control. By adjusting the slats, you can direct natural light precisely where you want it, creating a pleasant ambiance while minimizing glare. Shutters also offer privacy when the slats are closed, making them a good choice for ground-level windows or spaces facing busy streets. Shutters are installed directly onto the window frame, providing a built-in and seamless appearance. They can be customized to fit any window size or shape, making them suitable for unique architectural features or specialty windows. Another advantage of shutters is their durability. Well-crafted shutters can withstand the test of time, maintaining their beauty and functionality for years to come. *** Window treatments play a crucial role in enhancing the aesthetics and functionality of your space. Whether you're seeking privacy, light control, energy efficiency, or simply a touch of elegance, the options are plenty. At Off Cut Shades, we take pride in offering [high-quality roller shades](/shop) that are 100% made in Canada. Our commitment to craftsmanship and attention to detail ensures that you receive a product that not only looks great but also functions seamlessly. We hope this guide has provided you with valuable insights and inspiration for your window treatment projects. If you have any further inquiries or if there's anything else we can assist you with, please don't hesitate to [reach out](/contact). Happy window covering shopping!

Read Article