Custom blinds are made for one window, which means you can't try them on first. Most of us end up staring at a bare window, holding a tiny fabric square, trying to imagine six feet of it. That's the nervous part of buying blinds online, and it's a fair thing to be nervous about.
The easiest fix is a blinds visualizer: a tool that draws a shade on a photo of your own window. We built one, and it's useful. It's also a preview and not a promise, so this guide covers both sides: how to get a good result, and what you still need to check with real fabric and a tape measure. Details about our tool and policies are as of November 2026.
The Short Answer
There are three ways to see blinds on your window before you buy, and they answer different questions:
- A visualizer answers "will this style and colour suit my room?" Use it first, to narrow things down.
- Fabric samples answer "what does this fabric really look like in my light?" Use them second, on your two or three finalists.
- A tape measure answers "what size is my window?" Nothing else answers that one.
Use all three in that order and you've covered most of what can go wrong.
What a Blinds Visualizer Does
You give it a photo of your window, and it draws a shade on that photo. Change the fabric and the picture changes with it. That's a much better test than a showroom photo of someone else's living room, because your wall colour, your floor and your furniture are all in the shot.
Our visualizer runs in your browser on a phone, tablet or computer, so there's no app to download. As of November 2026 it's free with an Off Cut Shades account. It covers roller, zebra, sheer, Essential and Honeycomb cellular and Dream Shades.
How to Take a Photo That Gives You a Useful Preview
The preview is only as good as the photo. Our tool shows the first four of these before you upload, and they're worth following.
- Stand back. Get the whole window and some wall in the shot. The wall matters: that's what the shade has to go with.
- Stand straight in front of the window. Not at an angle, which makes the window harder to judge.
- Keep the window clear. Open the curtains, pull old blinds all the way up and move anything standing in front of it.
- Take it in daylight. You want to see the wall colour and the room clearly, because that's what you're matching.
- Start with the room that worries you most. A fabric that's lovely against a white dining room may look different beside a dark sofa, so try the hard room first.
Trying Shades on Your Window, Step by Step
- Upload your photo. Take it on your phone or use one you already have.
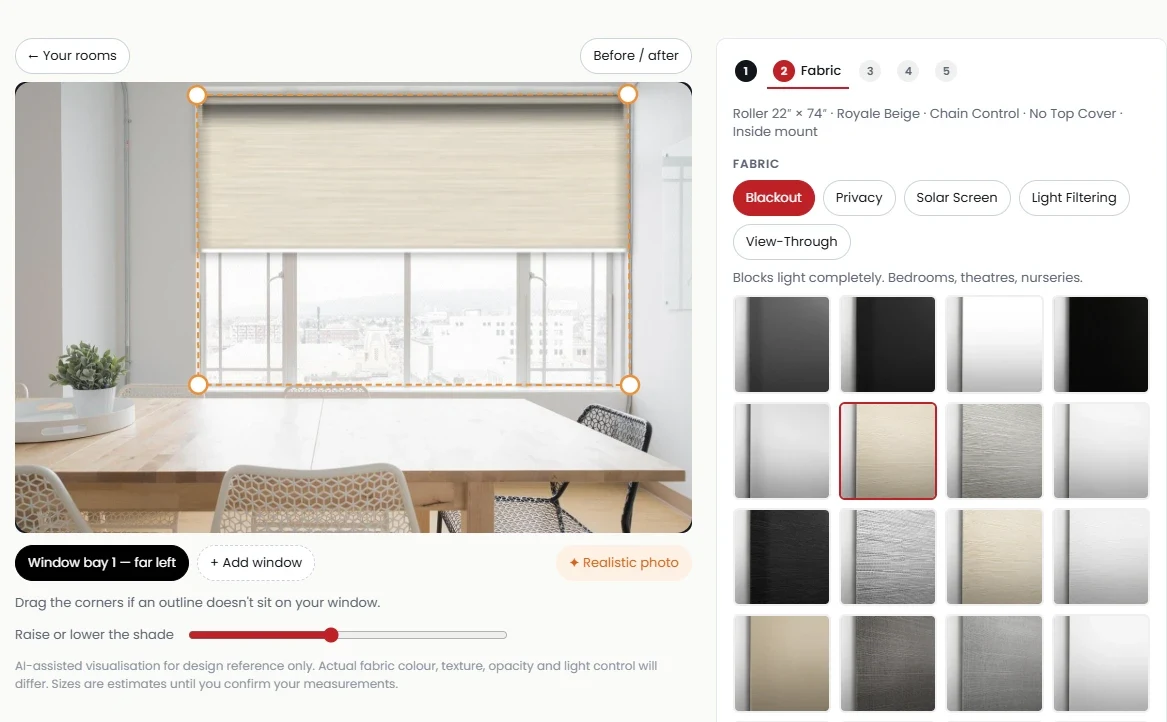
- Check the outline. AI finds the window, draws its outline and estimates the size. If the outline is off, drag a corner to fix it. Check how it read the window too: when we tried a wide window with several panes, it first split it into four bays, each with its own shade.
- Pick a shade type. If you're stuck between two, try both. A zebra and a roller can look close in a thumbnail and very different on a big window. Our zebra vs. roller comparison covers the differences a picture can't show.
- Try fabrics, controls and top covers. The estimated price updates as you go, which is handy: you can see what a motor or a fabric-covered top cover does to the price while you're looking at it. If it finds more than one bay, each keeps its own choices, so you can compare two fabrics side by side. A slider raises or lowers the shade.
- Make a realistic photo of your favourite. This is an AI-retouched version of the preview, and it gives you a more lifelike look at the result.
Your photos and the shades you try stay saved for 7 days, so there's no rush to decide in one sitting. The tool says photos are used only to show you shades and are deleted automatically after a week (as of November 2026).
What a Visualizer Gets Right
It's strong on the questions that are hard to answer in your head:
- Scale. How much of the wall a large shade takes up, and whether a dark fabric feels heavy at that size.
- Colour family. Whether grey, white or beige sits better with your walls and floors. That's usually enough to rule out half the options.
- Style. The flat look of a roller against the stripes of a zebra, on your actual window.
- Budget. A rough idea of the price before you've fallen in love with something out of range.
What It Can't Tell You
Our own disclaimer says it plainly: the preview is for design reference only, and actual fabric colour, texture, opacity and light control will differ. In practice, that means:
- Exact colour. A photo and a screen both change colour. "Light grey" on your phone is a guide and not a match.
- Texture. You can't feel a weave through a screen, and you can't see much of it either.
- Light and privacy. A photo is one moment. It can't show you how dark a blackout fabric gets, how much glare a sunscreen cuts, or what's visible from the street at night. Our roller shades buying guide explains how each fabric family behaves.
- Your room's small details. A retouched photo can shift small things in the picture, so judge the shade and not the fine print of the window frame.
- Your exact size. The size from the photo is an estimate that helps you compare shades and prices. It's not a measurement.
This matters more than usual with custom blinds. Every shade is cut for your window, so we can't offer ordinary returns. Our Fit Guarantee covers measuring mistakes, within 30 days of delivery for one complimentary adjustment or remake per eligible shade, up to four shades per household. It doesn't cover a change of style, colour or personal preference (all as of November 2026). So "it looked different in the picture" isn't something we can fix afterwards, and that's why the next step is worth ten minutes.
Get Samples of Your Finalists
Once the visualizer has you down to two or three fabrics, order free samples. You can choose up to 5 (as of November 2026). Hold each one up to the window at noon, and again in the evening with the lights on, because that's when differences in colour and privacy show up. If you're near Toronto, you can also see our shades at our showroom.
From Preview to Real Order
You can add a shade to your cart straight from the visualizer, but it won't go through on the photo's guess. Here's what happens before checkout:
- Your cart marks the size as estimated. Checkout stays locked until you confirm it.
- You enter your measured size. Measure the window first. Our measuring guide and our step-by-step post on measuring walk you through it, and our inside vs. outside mount guide helps you pick how the shade sits.
- You approve the price at the real size. You'll see the estimated price next to the price at your measured size, and you approve the change.
- We re-check the control. A photo can underestimate a window, and some controls don't work at every size. If the one you chose doesn't fit your measured size, we switch it, tell you, and show the change before you approve.
Expect the price to move at this stage. The estimate was based on an estimated size, and our custom blinds cost guide shows how much size changes the bill.
When You Can Skip the Visualizer
It isn't for every purchase. Skip it if you're replacing a shade you already like with the same colour and type, or if you're doing a spare room where nobody cares what it looks like. In both cases, get a price in 60 seconds and move on.
It also won't settle a purely practical choice. If the question is how dark a bedroom gets or how to stop glare on a screen, a picture won't help. Go to samples and the buying guides instead.
Visualizer FAQ
Is a photo preview accurate enough to order from?
For choosing a style and a colour family, it's a good start. For the final colour, use a sample. For size, use a tape measure.
Do I need to measure if the visualizer estimates the size?
Yes. With ours, you can't check out until you've entered a measured size and approved the price at that size.
Can I try more than one shade on the same window?
Yes, as many as you like. That's the main reason to use one.
Do I have to download an app?
Not for ours. It runs in your browser.
What if my photo shows old blinds or curtains?
Raise or pull them back as far as they go before you take the photo, so the frame shows. If the outline still lands in the wrong place, drag a corner to fix it.
See It, Sample It, Measure It
Start with a photo: try the visualizer on your own window. Take your favourites to free samples, measure with our guide, and order when you're sure. Your shades get made to that size in our Toronto factory, and by then you'll already know how they should look.